Since its introduction virtualization has come a long way. Nowadays hypervisors are used for almost everything from running enterprise-level servers to testing different operating systems on a local user computer. There are many paid and free hypervisor solutions available in the world.
But in this guide, we are looking at installing one of these best free toolsets used for virtualization and they’re Virt-Manager, KVM, and QEMU. This guide will show you how to install these tools correctly and with less hassle. Before starting let’s get to know this software a bit better.
What is Virt-Manager?
Virt-Manager is a graphical user front end for the libvirt library which provides virtual machine management services. Virt-manager interface makes it easy for the user to create, delete and manipulate virtual machines without going through the terminal.
Virt-manager mainly support KVM but it can work with other hypervisors such as Xen and LXC.
When virt-manager is installed it comes with the below-listed toolset.
- virt-install: Command-line utility to provision OS
- virt-viewer: The UI interface with graphical features
- virt-clone: Command-line tool to close existing inactive hosts
- virt-xml: Command-line tool for easily editing libvirt domain XML using virt-install’s command-line options.
- virt-bootstrap: Command tool providing an easy way to set up the root file system for libvirt-based containers.
KVM
The letters KVM stands for Kernel-based Virtual Machines. KVM is a Linux full virtualization solution for x86 architecture processors which has the virtualization extension (Intel VT and AMD-V).
KVM is a free (as free beer) and open-source software. The support for KVM is included in all the new Linux kernels by design.
QEMU
QEMU is the shortened version of Quick EMUlator which is a free open-source emulator that can perform hardware virtualization. It emulates the host machine processor through dynamic binary translation. Which provides different sets of hardware and device models for the host machine, which enables it to run a variety of guest systems.
KVM can be used with QEMU which allows virtual machines to be run nearly to native speeds. Not just hardware emulation QEMU is capable of emulating user-level processors which enable applications compiled for one architecture to run on another.
Installing virt-manager
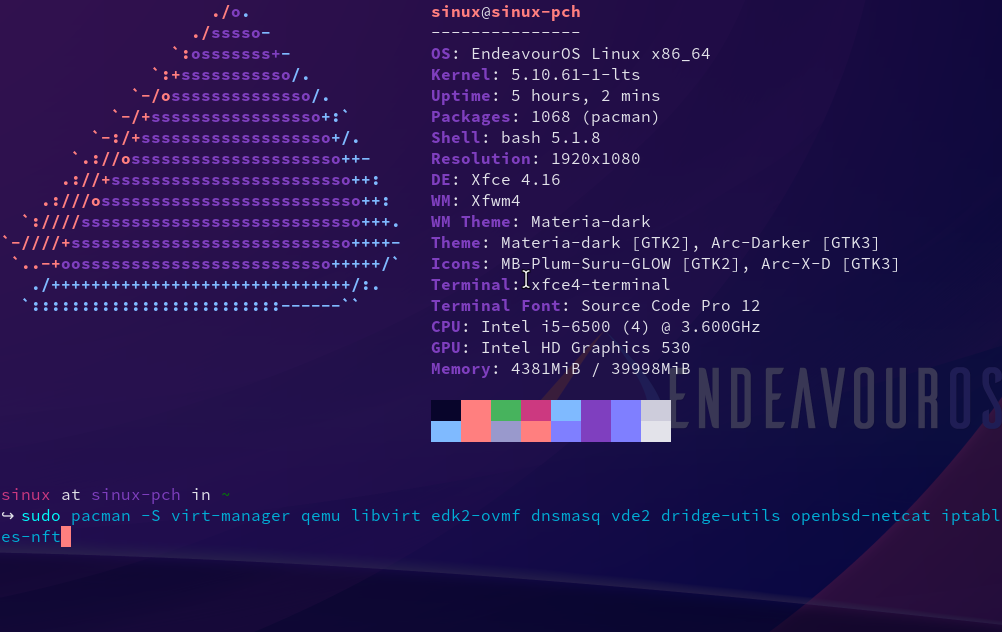
- Installing all the packages to run virt-manager.
sudo pacman -S virt-manager qemu libvirt edk2-ovmf dnsmasq bridge-utils openbsd-netcat iptables-nft
- After installation completes you need to enable libvirtd service.
sudo systemctl enable --now libvirtd.service
- Check for the status to make sure the service is running.
sudo systemctl status libvirtd.service
The output should look something like below.
○ libvirtd. service - Virtualization daemon
     Loaded: loaded (/usr/lib/systemd/system/libvirtd.service; enabled; vendor preset: disabled)
     Active: inactive (dead) since Tue 2021-08-31 20:33:58 +0530; 1h 14min ago
TriggeredBy: ● libvirtd-admin.socket
             ● libvirtd-ro.socket
             ● libvirtd.socket
       Docs: man:libvirtd(8)
             https://libvirt.org
    Process: 21412 ExecStart=/usr/bin/libvirtd $LIBVIRTD_ARGS (code=exited, status=0/SUCCESS)
   Main PID: 21412 (code=exited, status=0/SUCCESS)
      Tasks: 2 (limit: 32768)
     Memory: 18.5M
        CPU: 423ms
     CGroup: /system.slice/libvirtd.service
             ├─982 /usr/bin/dnsmasq --conf-file=/var/lib/libvirt/dnsmasq/default.conf --leasefile-ro --dhcp-script=/usr/lib/libvirt/libvirt_leaseshelper
             └─983 /usr/bin/dnsmasq --conf-file=/var/lib/libvirt/dnsmasq/default.conf --leasefile-ro --dhcp-script=/usr/lib/libvirt/libvirt_leaseshelper

Aug 31 20:31:42 sinux-pch systemd[1]: Started Virtualization daemon.
Aug 31 20:31:42 sinux-pch dnsmasq[982]: read /etc/hosts - 5 addresses
Aug 31 20:31:42 sinux-pch dnsmasq[982]: read /var/lib/libvirt/dnsmasq/default.addnhosts - 0 addresses
Aug 31 20:31:42 sinux-pch dnsmasq-dhcp[982]: read /var/lib/libvirt/dnsmasq/default.hostsfile
Aug 31 20:33:58 sinux-pch systemd[1]: libvirtd.service: Deactivated successfully.
Aug 31 20:33:58 sinux-pch systemd[1]: libvirtd.service: Unit process 982 (dnsmasq) remains running after unit stopped.
Aug 31 20:33:58 sinux-pch systemd[1]: libvirtd.service: Unit process 983 (dnsmasq) remains running after unit stopped.
Aug 31 21:03:23 sinux-pch dnsmasq[982]: reading /etc/resolv.conf
Aug 31 21:03:23 sinux-pch dnsmasq[982]: using nameserver 192.168.8.1#53
Aug 31 21:03:23 sinux-pch dnsmasq[982]: using nameserver 192.168.1.1#53
-
To use our normal user without entering the root password we need to configure KVM to enable it. This will also enable the libvirt networking components as well without doing this it won’t work.
- You need to open the libvirt configuration file located at
/etc/libvirt/libvertd.conf. To open you can use your favorite text editor (vi, vim, or nano).
sudo nano /etc/libvirt/libvirtd.conf- Now we need to set UNIX domain socket ownership to libvirt. Scroll down till you see the below line and uncomment it.
unix_sock_group = 'libvirt'- Let’s set the UNIX socket permission to R/W. Scroll down till you see the below line and uncomment it.
unix_sock_rw_perms = '0770'- Add your user account to the libvirt group.
sudo usermod -a -G libvirt $(whoami) or sudo usermod -a -G libvirt <your user name>whoamiis a function that put the current user to the placeholder
- Now we need to add our user to
qemu.conf. Otherwise,QEMUwill give a permission denied error when trying to access local drives. You can use your favorite text editor to edit the file.
sudo nano /etc/libvirt/qemu.conf- Scroll down or search for
user = "root"orgroup = "root". Then uncomment both entries and change therootto your user name or ID and then save and exit. Once edited it should look something like below.
# Some examples of valid values are: # # user = "qemu" # A user named "qemu" # user = "+0" # Super user (uid=0) # user = "100" # A user named "100" or a user with uid=100 # user = "your user name" # The group for QEMU processes run by the system instance. It can be # specified in a similar way to user. group = "your user name"- You can restart your service but it’s best to reboot the entire system.
sudo shutdown -r now - You need to open the libvirt configuration file located at
Additional Functionality
libguestfs
If you wish to edit the created virtual machine disk images you can install libguestfs. These are set of tools that allow the user to view and edit files inside guest systems, change VM script changes, monitoring disk space, creating new guests, P2V, V2V, performing backups, cloning VM, and much more.
To install.
yay -S libguestfs
qemu-arch-extra
Adds additional architecture support to QEMU.
To install.
yay -S qemu-arch-extra
qemu-block-gluster
Glusterfs is a scalable network filesystem. This adds Glusterfs block support to QEMU.
To install.
yay -S qemu-block-gluster
qemu-block-iscsi
iSCI enables storage access via a network. qemu-block-iscsi enables QEMU to block this.
To install.
yay -S qemu-block-iscsi
qemu-block-rbd
It adds the ability to create block device images.
To install.
yay -S qemu-block-rbd
samba
This would add support to SMB/CIFS support to QEMU.
To install.
yay -S samba
Enabling virtio graphics with 3D acceleration
There are several graphical accelerations modes supported by virt-manager.
-
QXL - QXL paravirtual graphic card. It is VGA compatible (including VESA 2.0 VBE support). Works best with qxl guest drivers installed though. Recommended choice when using the spice-protocol.
-
Bochs - The Bochs VGA BIOS supports, to an extent, the VBE specification.
-
Ramfb - A simple frame buffer that lives in guest RAM and is configured via fw_cfg.
-
VGA - Standard VGA card
-
Virtio - Virtio-gpu is a paravirtualized 3d accelerated graphics driver.
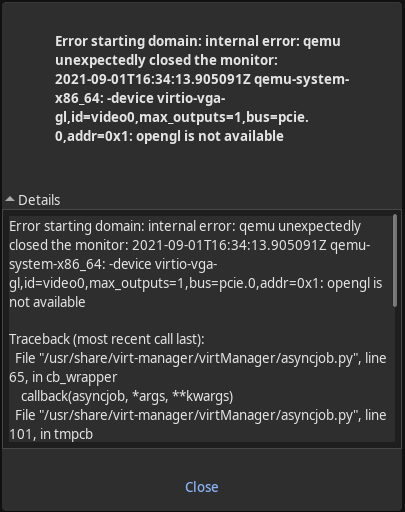
When using virtio with 3D acceleration some time virt-mangers doesn’t work and it throws an error. It’s actually is not virt-manager it’s qemu you that’s crashing.
In order to use virtio with 3D acceleration, you need to configure virt-manager as shown below.
-
Go to Display Spice and check Open GL check box and select Auto from the drop-down.
Before configuring,
After configuring,
-
Now go to Video and select virtio then check the 3D Acceleration checkbox.
-
Install
spice-vdagentguest drivers. In your gust operating system/disribution.


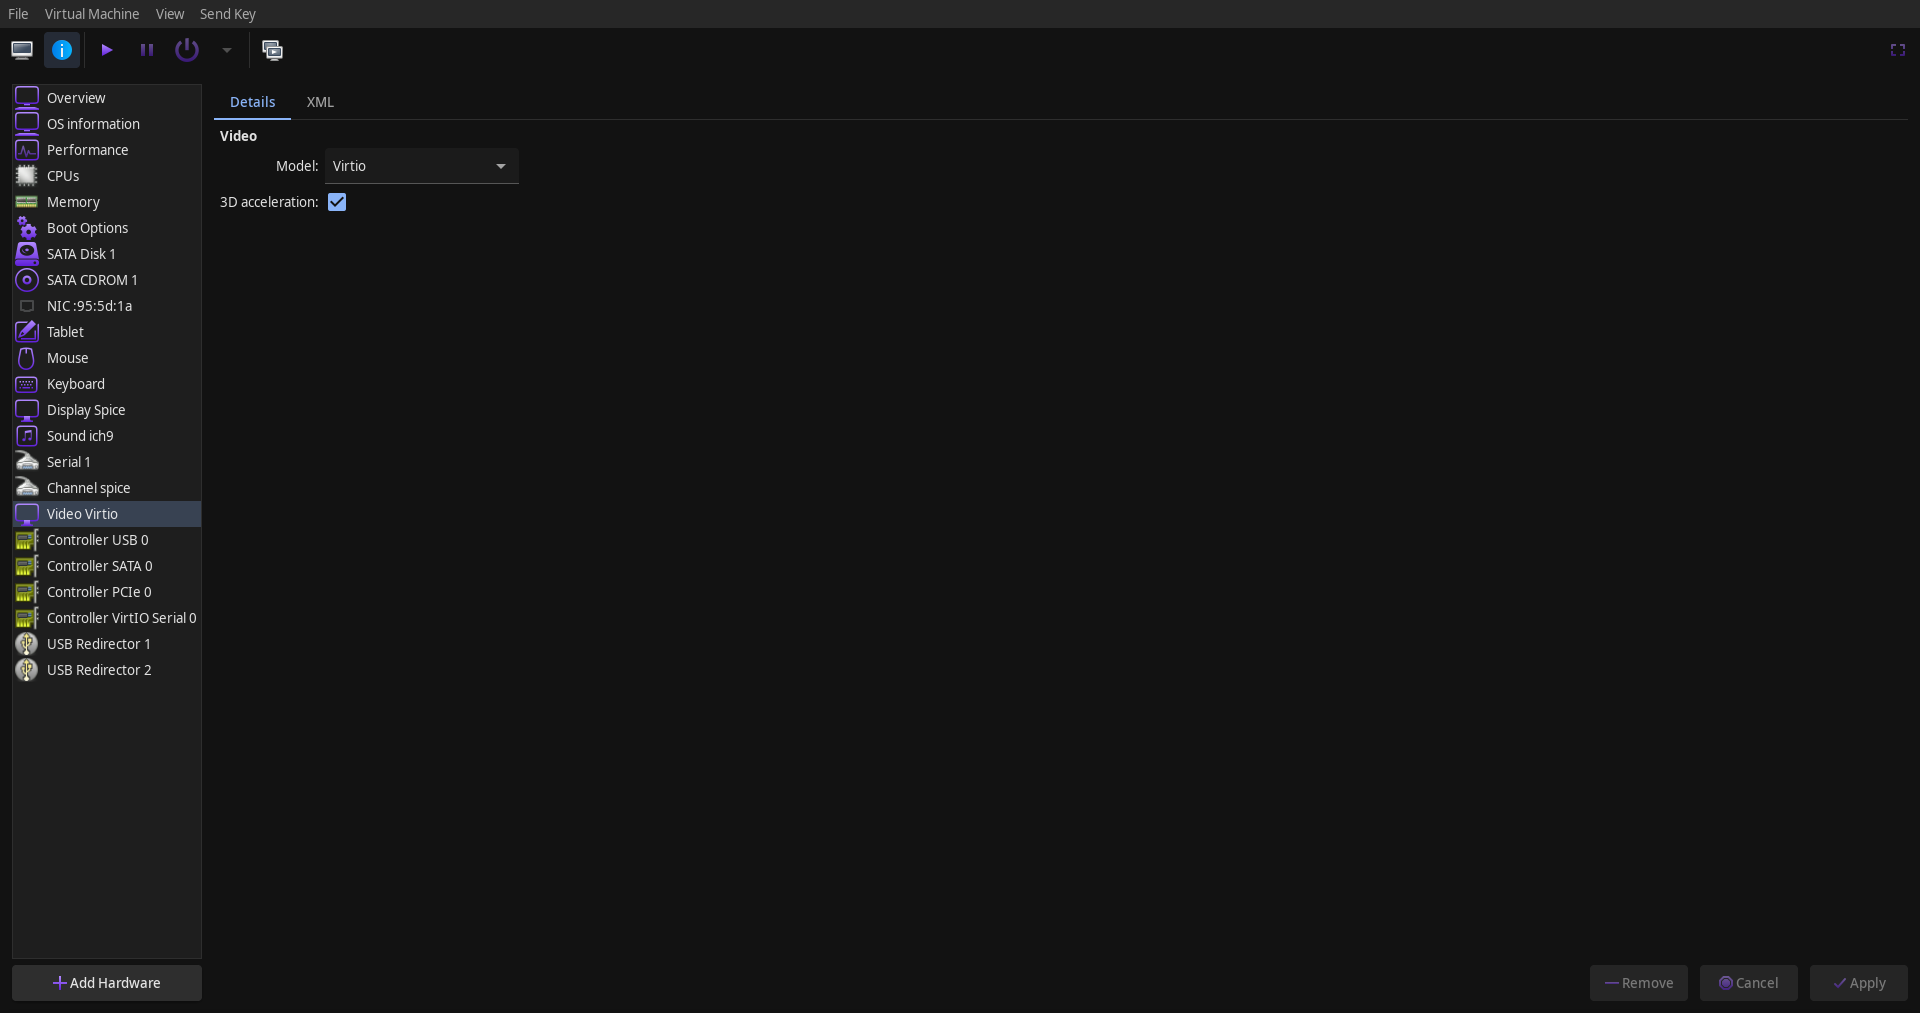
sudo pacman -S spice-vdagent
NOTE: At the time of writing there is an issue when using virtio with 3D acceleration with XFCE DE which leads to guests having a black screen. It is caused by the default xfwm4+compositing compositor. The known workaround is to use ‘QXL’ or virtio without 3D acceleration. If you want to use it with 3D acceleration you can find the workaround here.
After configuring like this you can enjoy a fully 3D accelerated guest VM. Also, remember to click on Apply.
Installing virtio guest drivers for Windows
RedHat supplies a set of guest drivers for virtio which covers the graphic drivers for the guest system. You can download the latest drivers from their GitHub page here.
Guest tools links
- Latest Windows virtio-guest tools setup EXE
- Latest Windows virtio-guest tools ISO
- Stable Windows virtio-guest tools
- All the released virtio tools version rep
Conclusion
In this article, we have covered most of the aspects of how to install and configure virt-manager and KVM. Hope this article helped you to get your virtual environment up and running. If there are any questions feel free to reach us at the forums or any other contact channel listed below.