RPi 4 B: overclocking, cpu temp

I’ve got this RPi 4 model B that I haven’t been using that much since I bought it some months ago. A couple of days ago, I pulled it out from the drawer and installed Raspberry OS (64-bit) on it. I am planning to do an EnOS ARM installation soon and perhaps try out other distributions as well.

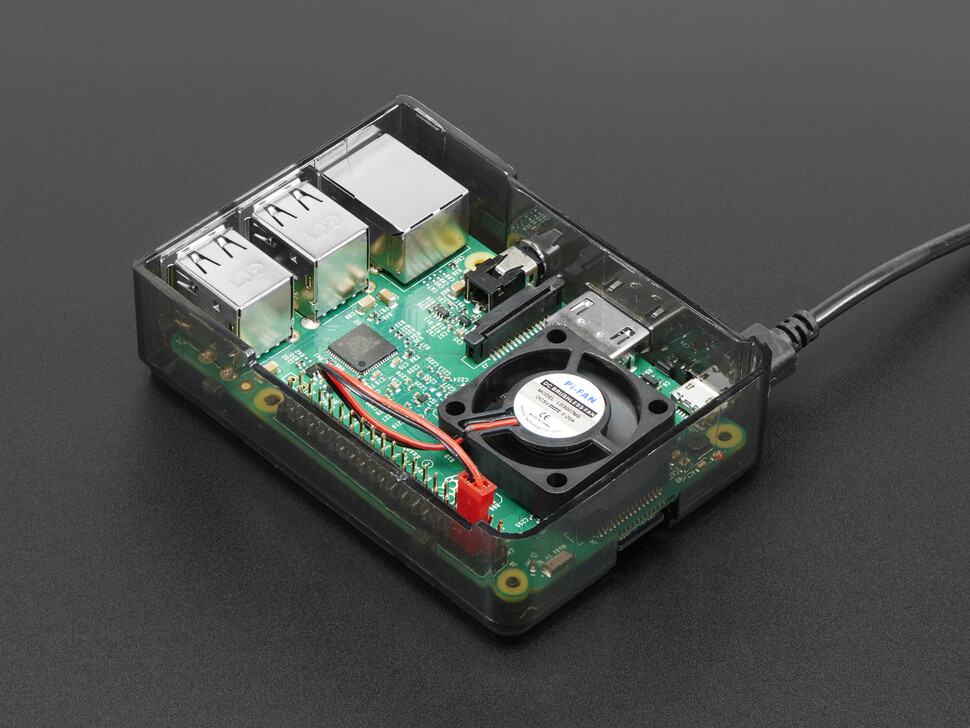
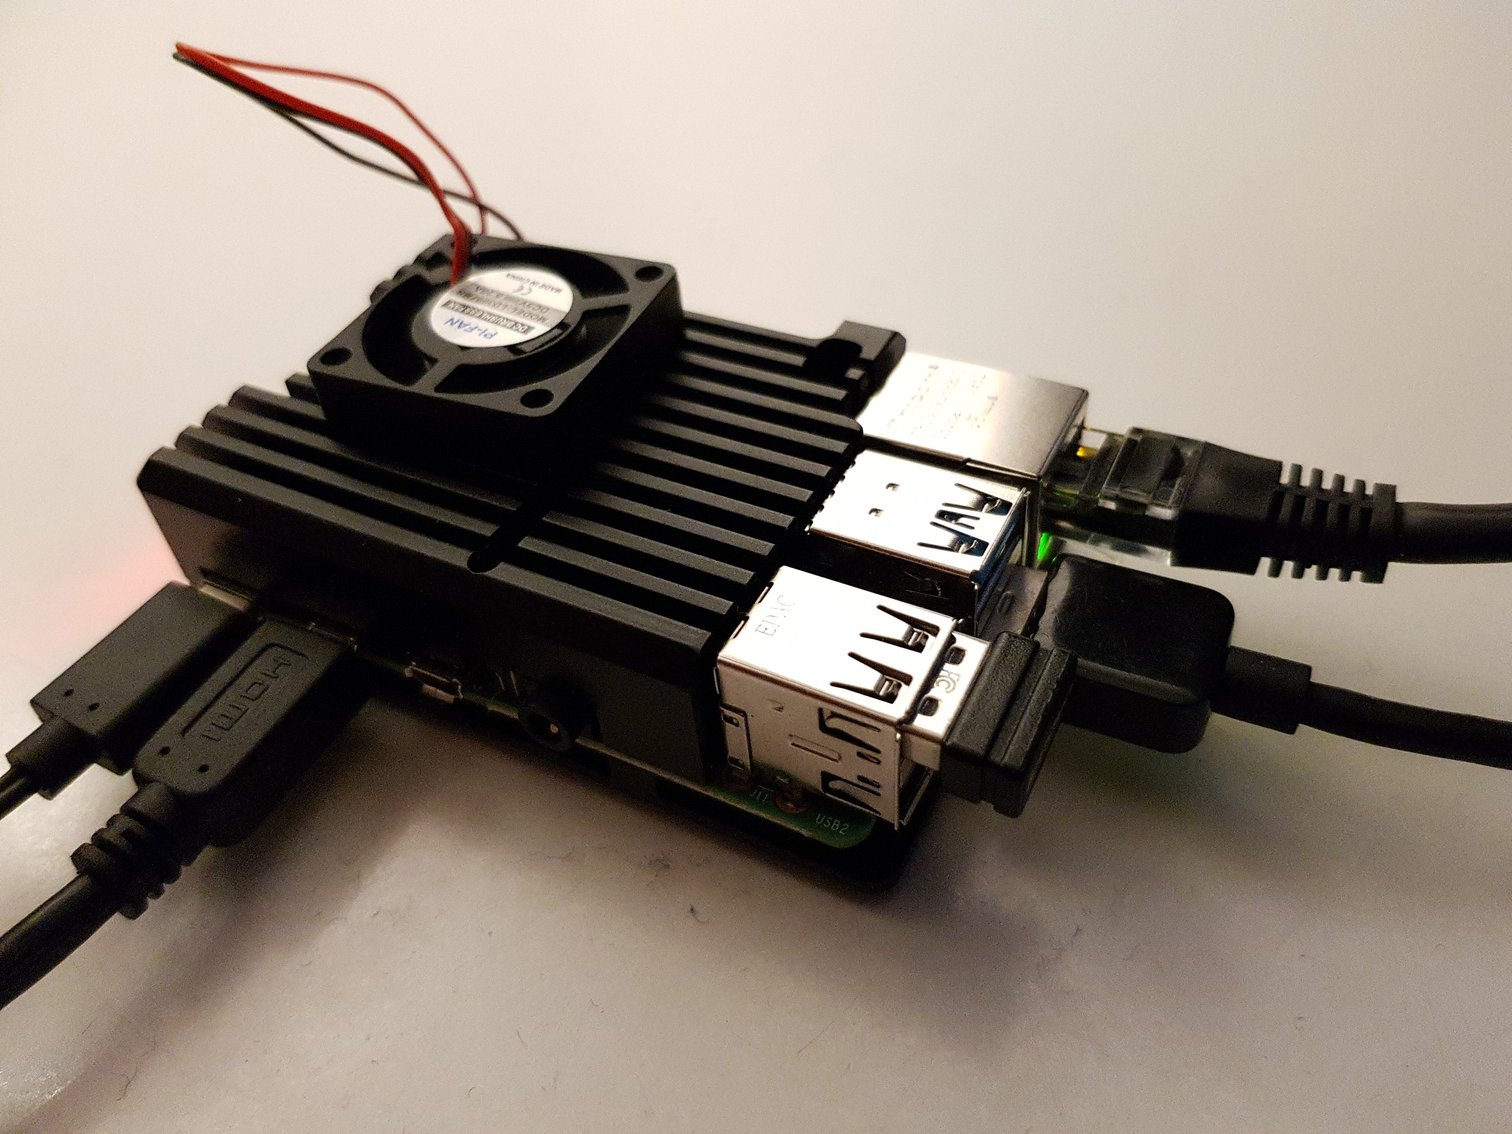
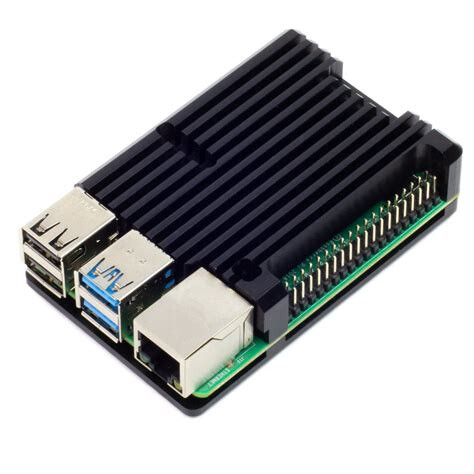
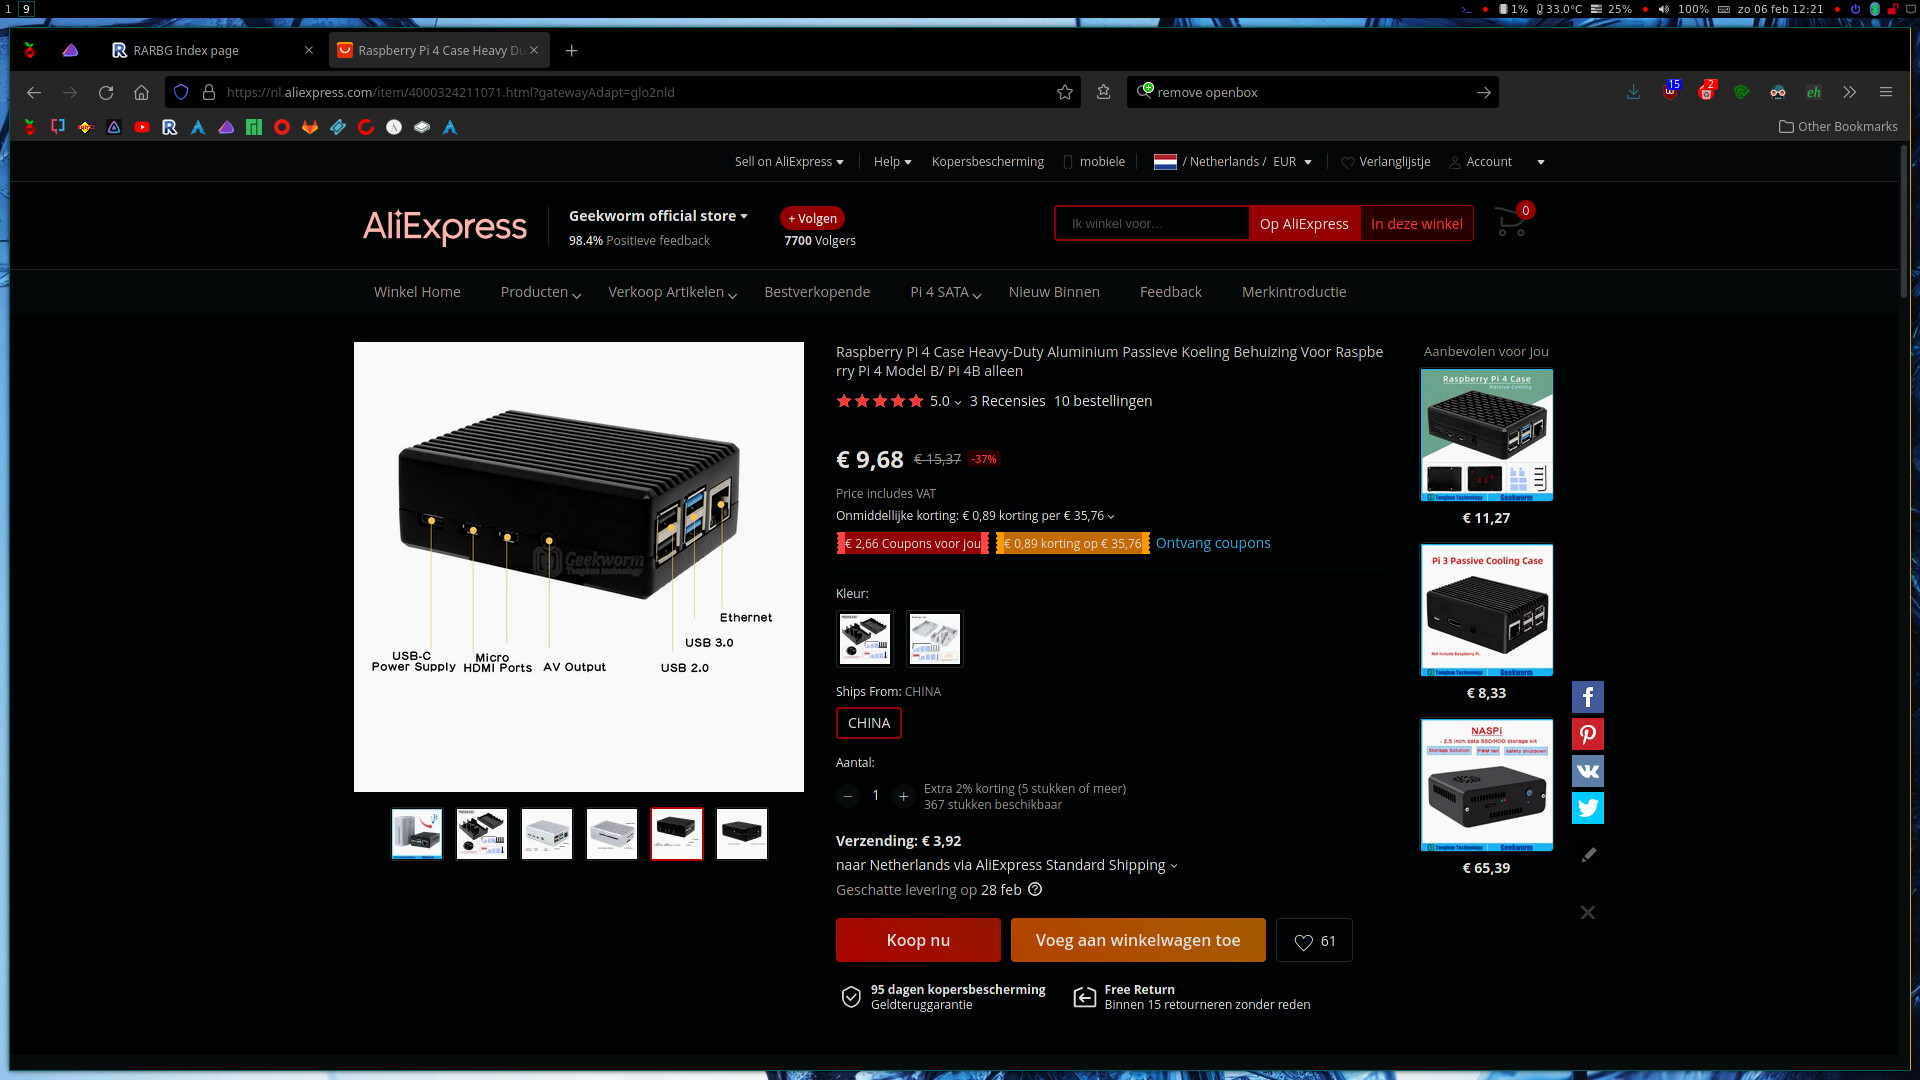
I just had a couple of questions regarding overclocking, cpu temperature and cooling. The Pi is overclocked to 2000 Mhz and currently have passive cooling in form of a

Pimoroni heatsink

image

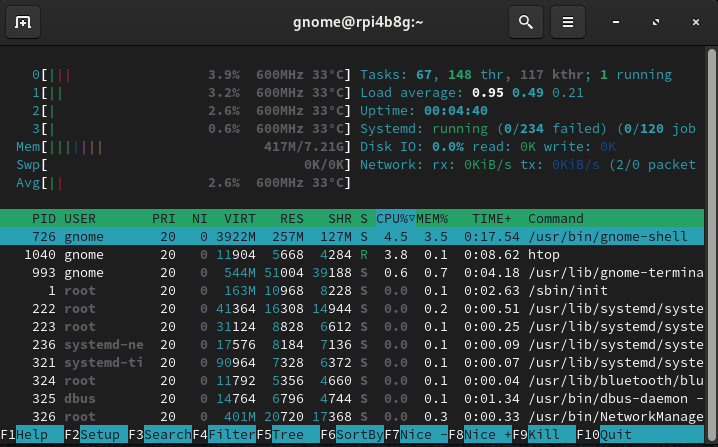
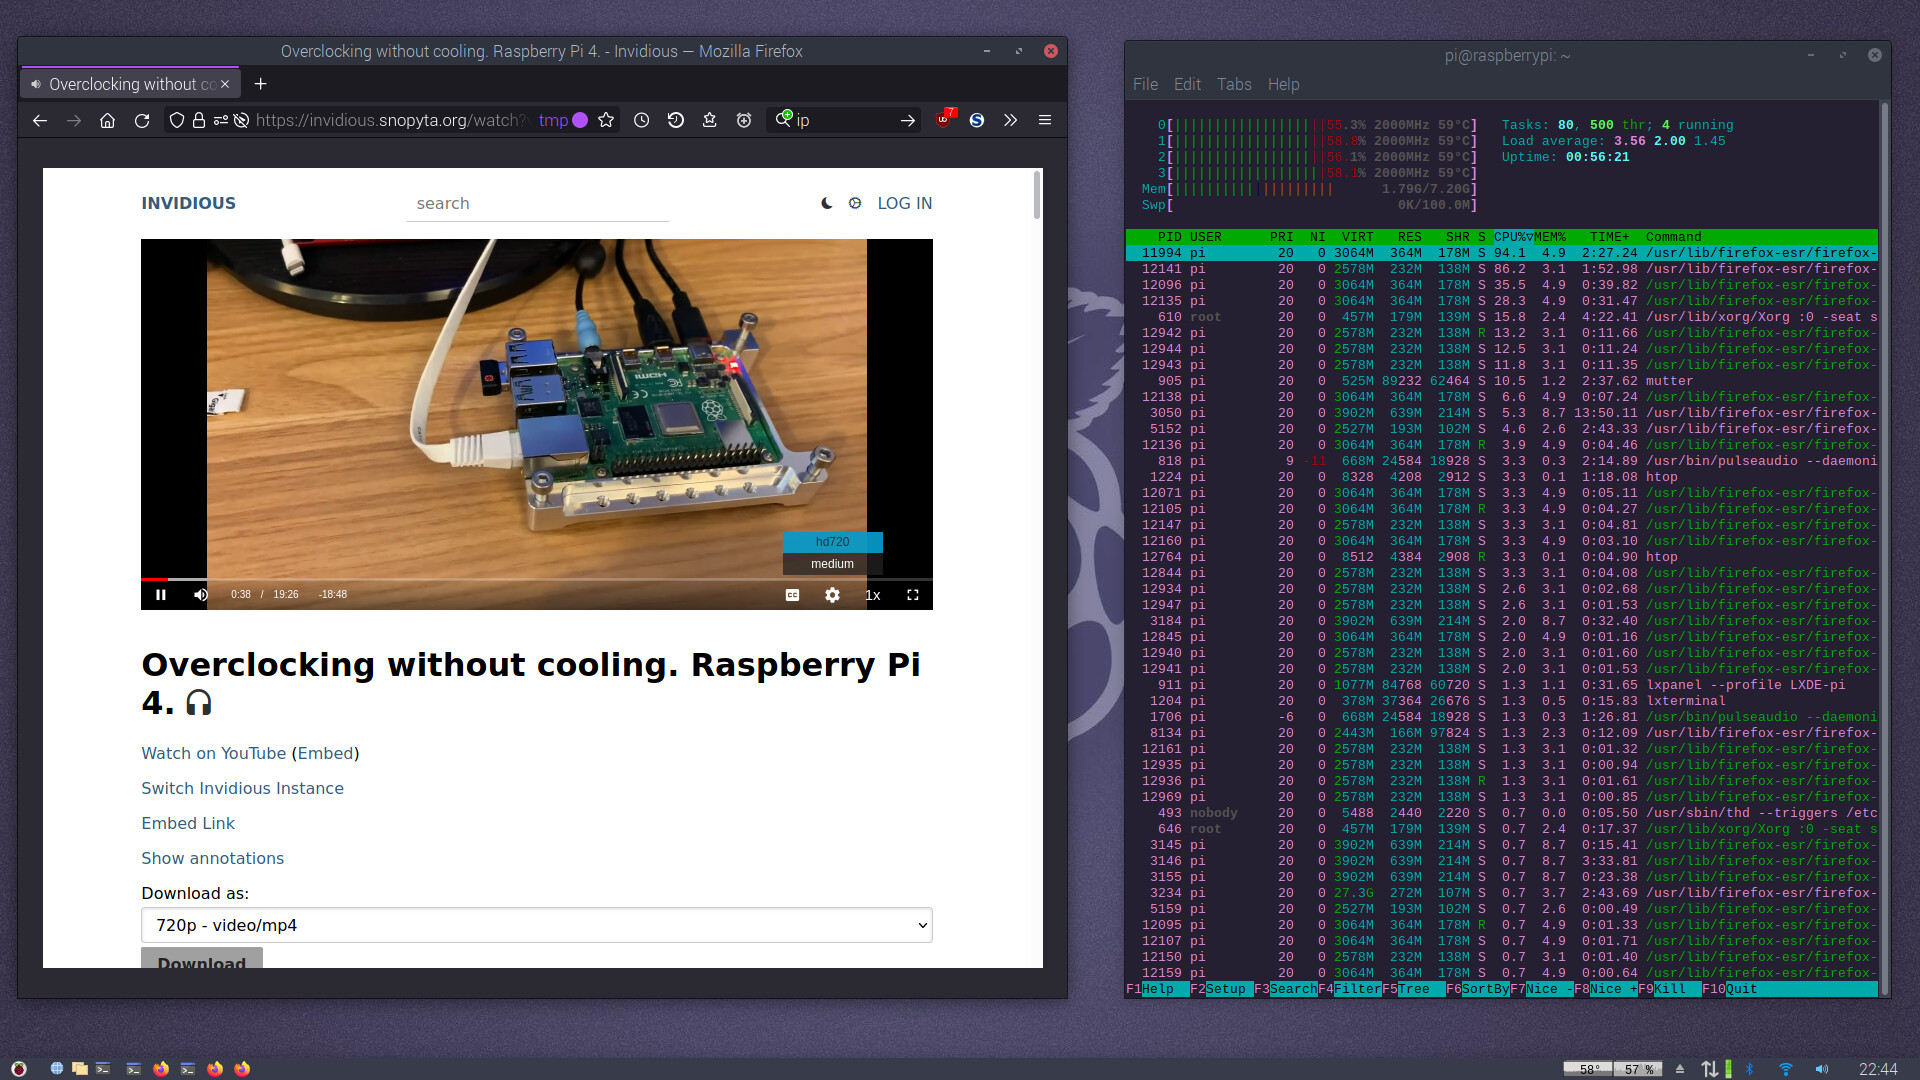
Streaming videos at 720 works just fine. The CPU runs at 2000 Mhz and the temp is somewhere between 55-60 Celsius.

Video Streaming

VidStream720

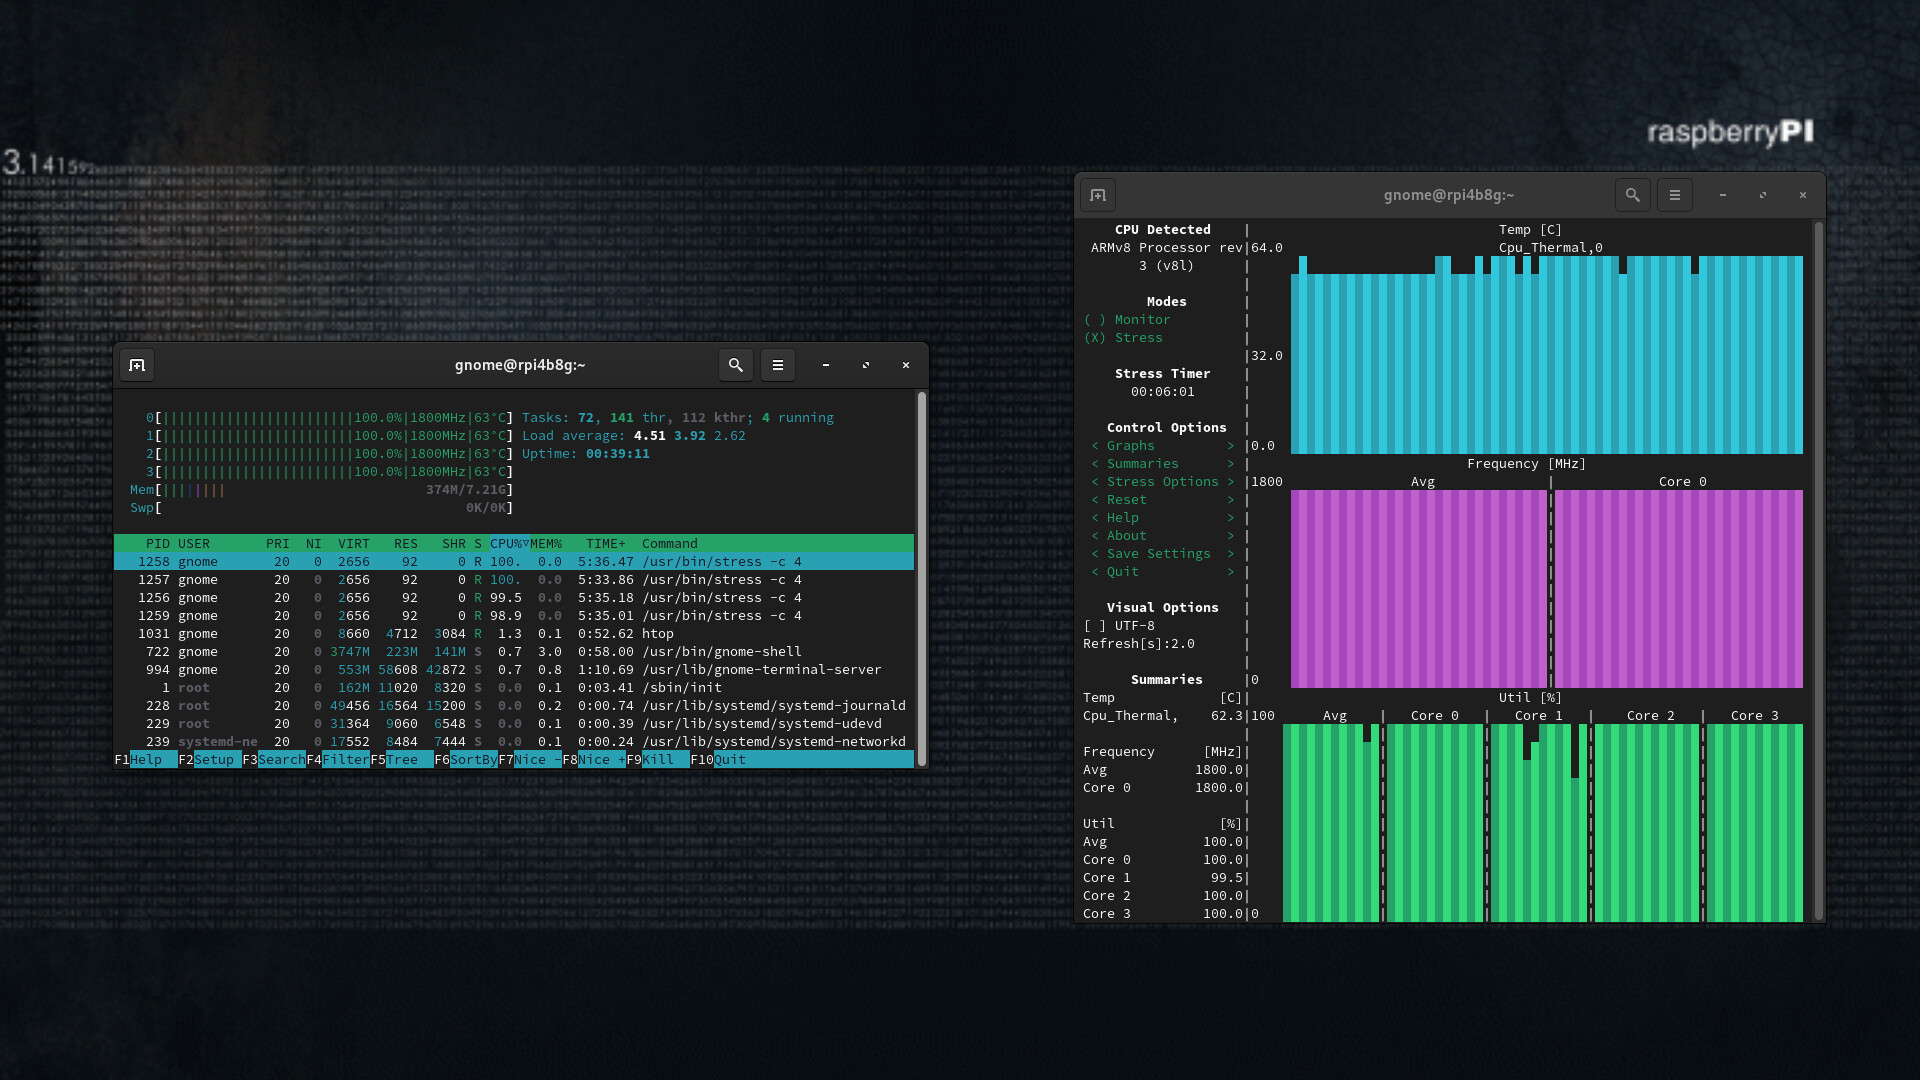
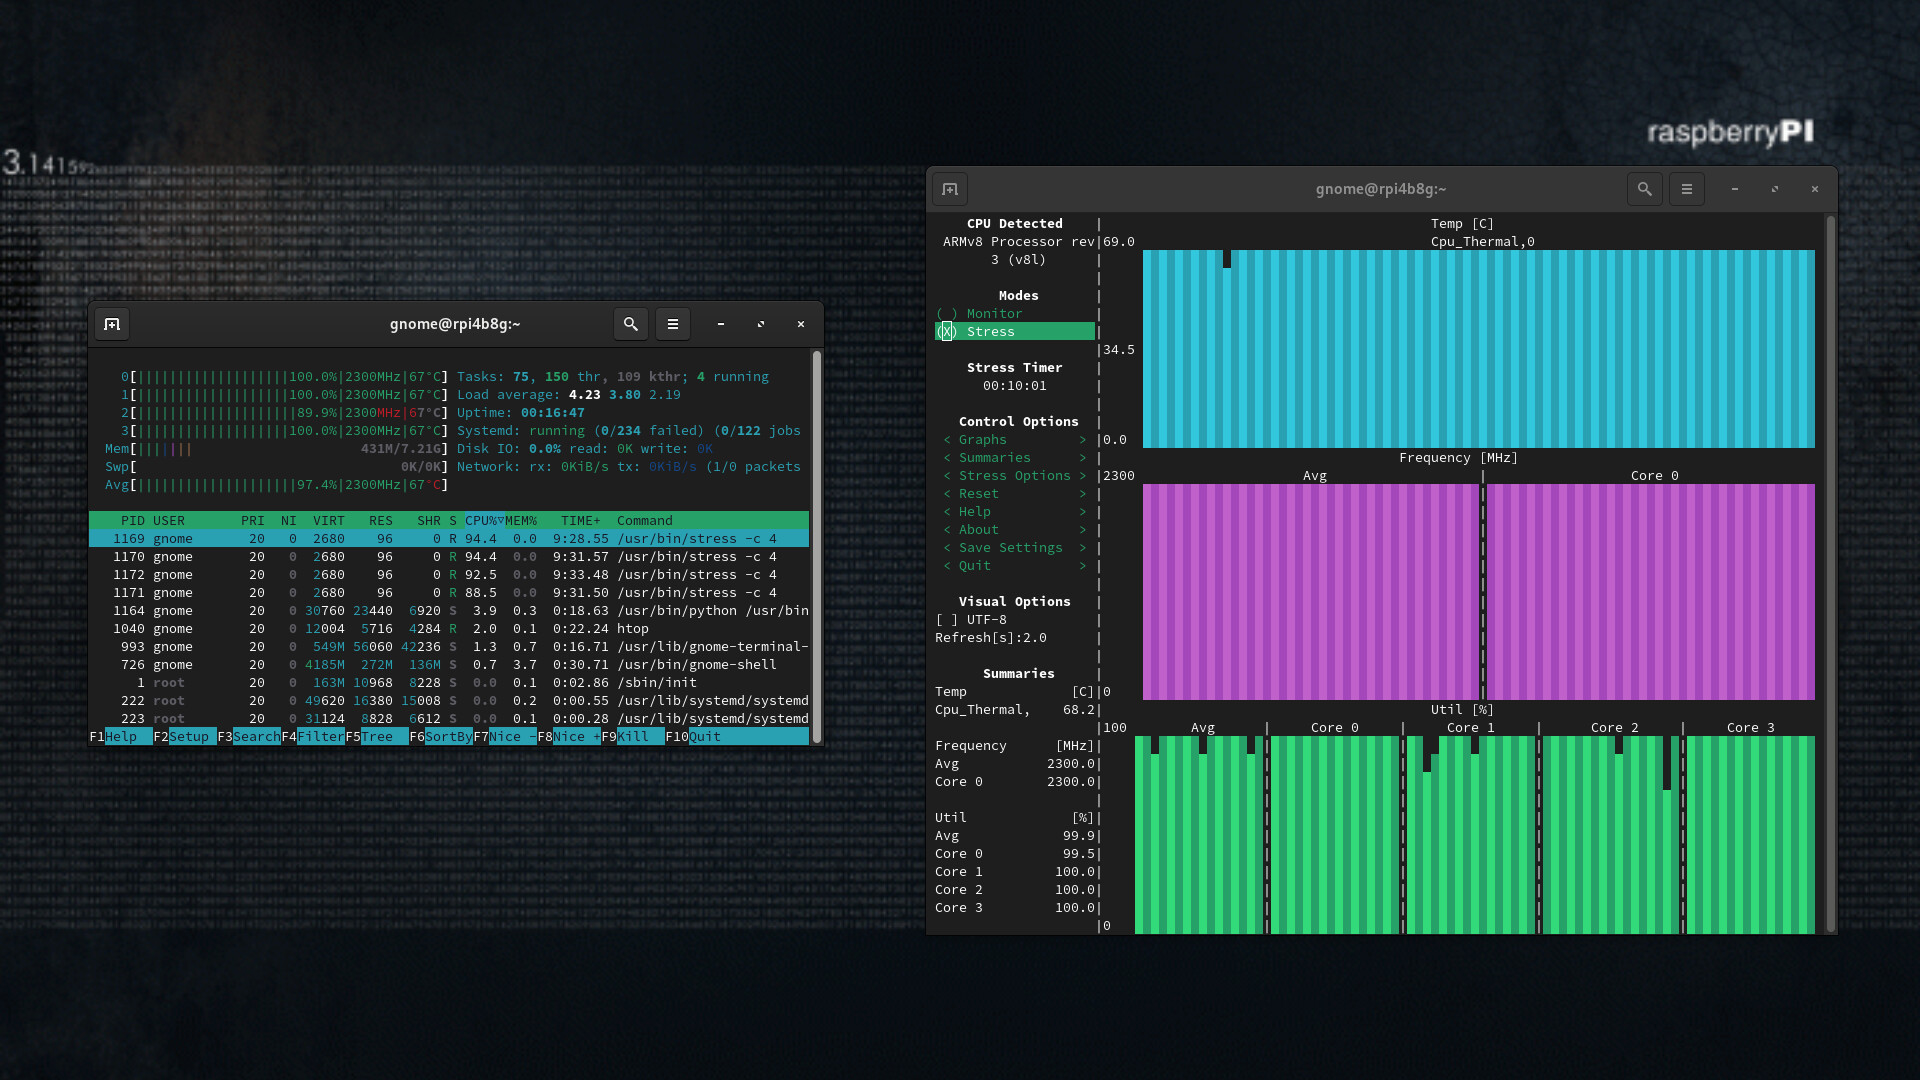
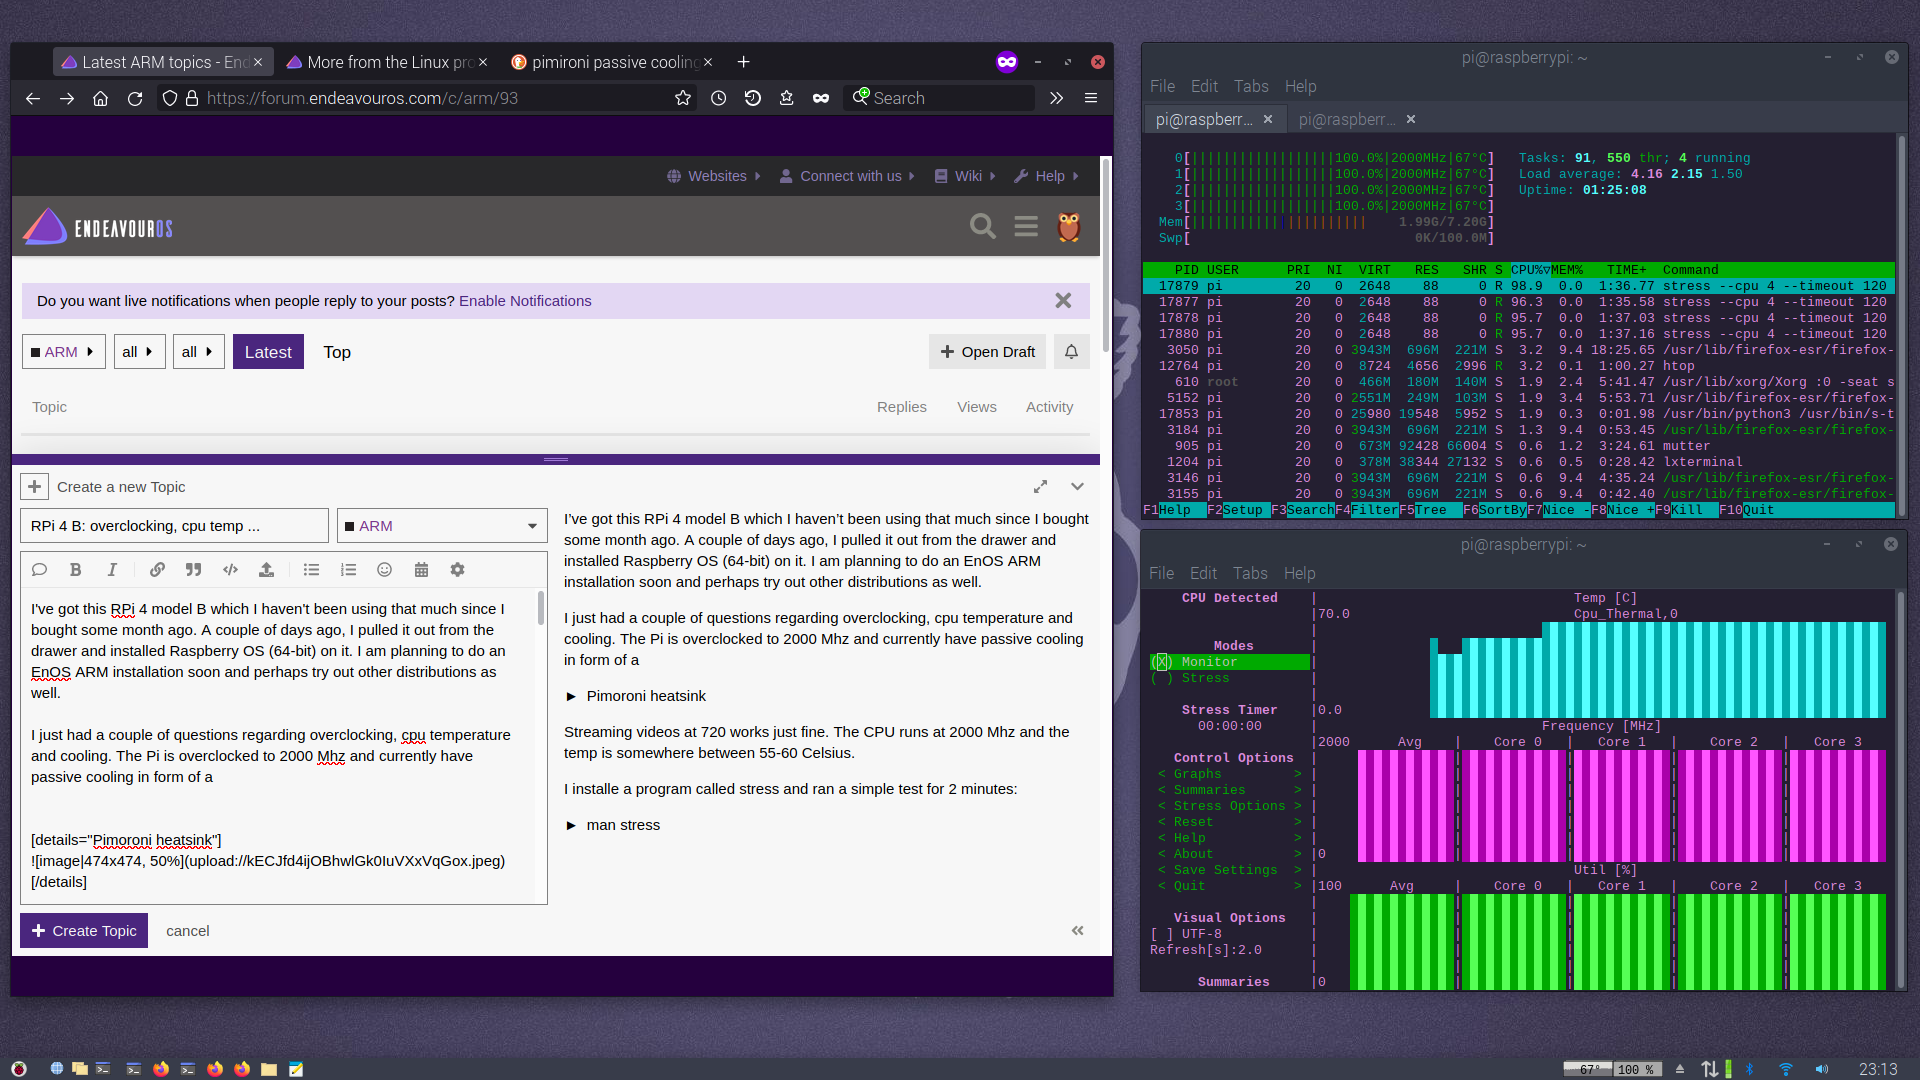
I installed a program called stress and ran a simple test for 2 minutes:

man stress
STRESS(1)                              User Commands                              STRESS(1)

NAME
       stress - tool to impose load on and stress test systems

SYNOPSIS
       stress [OPTION [ARG]] ...

DESCRIPTION
       `stress' imposes certain types of compute stress on your system

       -?, --help
              show this help statement

       --version
              show version statement

       -v, --verbose
              be verbose

       -q, --quiet
              be quiet

       -n, --dry-run
              show what would have been done

       -t, --timeout N
              timeout after N seconds

       --backoff N
              wait factor of N microseconds before work starts

       -c, --cpu N
              spawn N workers spinning on sqrt()

       -i, --io N
              spawn N workers spinning on sync()

       -m, --vm N
              spawn N workers spinning on malloc()/free()

       --vm-bytes B
              malloc B bytes per vm worker (default is 256MB)

       --vm-stride B
              touch a byte every B bytes (default is 4096)

       --vm-hang N
              sleep N secs before free (default none, 0 is inf)

       --vm-keep
              redirty memory instead of freeing and reallocating

       -d, --hdd N
              spawn N workers spinning on write()/unlink()

       --hdd-bytes B
              write B bytes per hdd worker (default is 1GB)

       Example: stress --cpu 8 --io 4 --vm 2 --vm-bytes 128M --timeout 10s

       Note: Numbers may be suffixed with s,m,h,d,y (time) or B,K,M,G (size).

SEE ALSO
       The  full  documentation  for stress is maintained as a Texinfo manual.  If the info
       and stress programs are properly installed at your site, the command

              info stress

       should give you access to the complete manual.

stress 1.0.4                             March 2010                               STRESS(1)
$ stress --cpu 4 --timeout 120 --verbose

stress: info: [17876] dispatching hogs: 4 cpu, 0 io, 0 vm, 0 hdd
stress: dbug: [17876] using backoff sleep of 12000us
stress: dbug: [17876] setting timeout to 120s
stress: dbug: [17876] --> hogcpu worker 4 [17877] forked
stress: dbug: [17876] using backoff sleep of 9000us
stress: dbug: [17876] setting timeout to 120s
stress: dbug: [17876] --> hogcpu worker 3 [17878] forked
stress: dbug: [17876] using backoff sleep of 6000us
stress: dbug: [17876] setting timeout to 120s
stress: dbug: [17876] --> hogcpu worker 2 [17879] forked
stress: dbug: [17876] using backoff sleep of 3000us
stress: dbug: [17876] setting timeout to 120s
stress: dbug: [17876] --> hogcpu worker 1 [17880] forked
stress: dbug: [17876] <-- worker 17877 signalled normally
stress: dbug: [17876] <-- worker 17878 signalled normally
stress: dbug: [17876] <-- worker 17879 signalled normally
stress: dbug: [17876] <-- worker 17880 signalled normally
stress: info: [17876] successful run completed in 120s

The CPU ran 100% at 2000 Mhz and the temperature went up to 67 but never above. After the test was done, the temp fell immediately down to 55.

Stress test

StressTest

I just wondered if this current setup is doing ok in terms of cooling and cpu performance.

Here is the

/boot/config.txt
# For more options and information see
# http://rpf.io/configtxt
# Some settings may impact device functionality. See link above for details

# uncomment if you get no picture on HDMI for a default "safe" mode
#hdmi_safe=1

# uncomment the following to adjust overscan. Use positive numbers if console
# goes off screen, and negative if there is too much border
#overscan_left=16
#overscan_right=16
#overscan_top=16
#overscan_bottom=16

# uncomment to force a console size. By default it will be display's size minus
# overscan.
#framebuffer_width=1280
#framebuffer_height=720

# uncomment if hdmi display is not detected and composite is being output
#hdmi_force_hotplug=1

# uncomment to force a specific HDMI mode (this will force VGA)
#hdmi_group=1
#hdmi_mode=1

# uncomment to force a HDMI mode rather than DVI. This can make audio work in
# DMT (computer monitor) modes
#hdmi_drive=2

# uncomment to increase signal to HDMI, if you have interference, blanking, or
# no display
#config_hdmi_boost=4

# uncomment for composite PAL
#sdtv_mode=2

#uncomment to overclock the arm. 700 MHz is the default.
#arm_freq=800

# Uncomment some or all of these to enable the optional hardware interfaces
#dtparam=i2c_arm=on
#dtparam=i2s=on
#dtparam=spi=on

# Uncomment this to enable infrared communication.
#dtoverlay=gpio-ir,gpio_pin=17
#dtoverlay=gpio-ir-tx,gpio_pin=18

# Additional overlays and parameters are documented /boot/overlays/README

# Enable audio (loads snd_bcm2835)
dtparam=audio=on

# Automatically load overlays for detected cameras
camera_auto_detect=1

# Automatically load overlays for detected DSI displays
display_auto_detect=1

# Enable DRM VC4 V3D driver
dtoverlay=vc4-kms-v3d
max_framebuffers=2

# Run in 64-bit mode
arm_64bit=1

# Disable compensation for displays with overscan
disable_overscan=1

[cm4]
# Enable host mode on the 2711 built-in XHCI USB controller.
# This line should be removed if the legacy DWC2 controller is required
# (e.g. for USB device mode) or if USB support is not required.
otg_mode=1

[all]

[pi4]
# Run as fast as firmware / board allows
arm_boost=1

[all]
gpu_mem=512

over_voltage=4
arm_freq=2000
gpu_freq=600

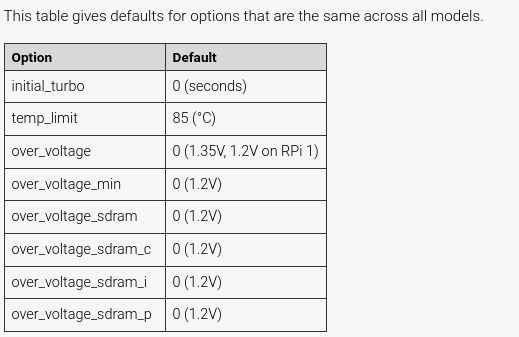
And these are the modifications I made:

gpu_mem=512
over_voltage=4
arm_freq=2000
gpu_freq=600

Thanks for reading and looking forward your comments.

2 Likes

I have a RPI 4B the 4GB model, 64bit raspberrypi OS and ran the same test as you did. Temps reached 55.1 degrees Celcius at a room temp of 17C. I have the pi CPU overclocked to 1850MHz.

╭─pi at raspberrypi in ⌁
╰─λ stress --cpu 4 --timeout 120 --verbose 0 (3.898s) < 12:16:20
stress: info: [36954] dispatching hogs: 4 cpu, 0 io, 0 vm, 0 hdd
stress: dbug: [36954] using backoff sleep of 12000us
stress: dbug: [36954] setting timeout to 120s
stress: dbug: [36954] → hogcpu worker 4 [36955] forked
stress: dbug: [36954] using backoff sleep of 9000us
stress: dbug: [36954] setting timeout to 120s
stress: dbug: [36954] → hogcpu worker 3 [36956] forked
stress: dbug: [36954] using backoff sleep of 6000us
stress: dbug: [36954] setting timeout to 120s
stress: dbug: [36954] → hogcpu worker 2 [36957] forked
stress: dbug: [36954] using backoff sleep of 3000us
stress: dbug: [36954] setting timeout to 120s
stress: dbug: [36954] → hogcpu worker 1 [36958] forked
stress: dbug: [36954] ← worker 36955 signalled normally
stress: dbug: [36954] ← worker 36956 signalled normally
stress: dbug: [36954] ← worker 36957 signalled normally
stress: dbug: [36954] ← worker 36958 signalled normally
stress: info: [36954] successful run completed in 120s

It’s a headless install and it’s in this aluminum case:

Thank you so much for your reply!
And also for doing the test and posting the results!

As it seems with your configuration, you get lower temps as what I got before. But mine was overclocked at 2000 and perhaps and also different solution for cooling.

I’ll be testing this somewhat more methodically and post the results later on.

In the meantime, I’ll be grateful for any and all input regarding overclocking (pros and cons), cooling methods, tips and tricks…

just my opinion. if over clock best use fan

:pray: use fan if 2Ghz +

1 Like

Thanks! I appreciate you sharing your experience!
I’ll look into what I can find.

1 Like

Did you alter the over_voltage after installing RPI 64bit? As I come to understand it your Pi got a boost to a base clock of 1800MHz. Maybe you can get the Pi stable at 2000MHz with an over voltage of 2.

I ran the same stress test. I have this heatsink case:

2022-02-06-173858_1487x688_scrot

With a Noctua fan (a solution Pudge shared in the forum), at 2000 GHz, temperatures remain somewhere above 40 degrees.

Without the fan, I ran the test a few times and temperatures wouldn’t go above 70. But they kept going up.

So I increased the test duration and eventually temps reached 76 degrees and to the end of my 820 seconds test they didn’t drop below 74.

So this cumulative effect will extend even further, I am not sure they wouldn’t continue to go up. Temperature room is rather cool, many people say Portugal is the place in Europe where people’s homes are colder in the Winter, probably the Portuguese only care about Summer.

By the way, how do you monitor the temperature readings? I used “watch sensors”, but I had to keep watch :slight_smile: Maybe saving it to a file would and then look through it would help.

2 Likes

watch vcgencmd measure_temp

Right, that’s it.

These are the changes I had done prior to the stress test:

gpu_mem=512
over_voltage=4
arm_freq=2000
gpu_freq=600

Sure, worth a try.
I a going to do a series of testing based on different configs.
I’ll be also looking for some ways to do some benchmarking. I’ll be posting some results later on.

Edit: Sorry, I forgot to paste in the changes that I had made in the config.txt :man_facepalming:t5:

2 Likes

Yours looks somewhat similar to the one I also use the Pimoroni, however

This makes obviously a significant impact on keeping the temp down.

Thank you so much for testing and posting your results! It gives me some reference to compare with.

In Raspberry OS, for the temp, the same command as posted by @anon13373109 but with the -n1 flag

-n, --interval seconds to wait between updates

watch -n1 vcgencmd measure_temp

For the clockspeed:

watch -n1 vcgencmd measure_clock arm

Htop can also be set up to show clock frequency and temperature.

1 Like

Add this little fan

to your current heatsink / case and you will drop your temps by about 15 degrees C.
Mount it like the first image in this post.

Mount it with the supplied silicone legs except not slanted.

Click on “See here for temp” to see temps at 2000 Mhz.

Pudge

2 Likes

Thanks for your input @Pudge ! I appreciate it.

The Noctuna fan looks good! I guess I need to do some accessory shopping for my Pi.

I have had a look at at the documentation for the config.txt here:

Particularly this parameter

temp_limit

Overheat protection. This sets the clocks and voltages to default when the SoC reaches this value in degree Celsius. Values over 85 are clamped to 85.

Screenshot from 2022-02-06 22-23-21

Does this means that the Pi could rather “safely” come up to temperatures right below 85.

In other words, am I right in assuming that in my case, with only passive cooling, I could come up to anywhere between 65-80 without anything harmful happens to the board?

I think perhaps before I get a fan, I could put temp_limit=70 or 75 ?
Does this approach seem reasonable to you?

1 Like

Supposedly, that statement is correct.
However, I think you would start to get CPU throttling well before that happens. So even if that temp doesn’t fry your SOC it could result in decreased performance and possibly shorten the CPU life span. This is pretty much a true statement for all electronics, the cooler it runs, the longer it lasts.

IMHO if a $14 USD fan can get my general usage temperature under 30 degrees C, which is half of temp_limit=70 or 75, I would consider it a worthwhile expense just to try and get the most life span out of it as possible.

In my experience, there are two things that have a large influence on the life span of an electronic device.
Dirty power or smaller power supplies that are marginal for the device, and high operating temperatures.

Remember, a USB SSD will most likely be an additional load on the power supply. Also, a keyboard, mouse, and maybe a thumb drive on a NON-powered USB HUB would also be additional load.

Take a well designed electronic device, give it clean power and keep it cool and it will probably last a long time.

Pudge

2 Likes

You are certainly right in everything you said. I get it totally.

I was rather “theoretically” curious about the relation between the temperature, performance and of course the lifespan of the device and how one could play with those variables to find a reasonable “middle-ground”.

So true! I will surely look into it during the next week.

This a great advice!
Thank you so much for taking your time and share your experience and know-how! I appreciate it.

Still between chair and keyboard :blush:

PS - I am using one of these as power supply:

Do you think they are OK?

1 Like

Noctua fans are made in Germany, so availability should be good in Europe.

I have a couple of “Official” Raspberry Pi 4 power supplies, they even have a Raspberry Logo, and the specs on them are 5.1 volts at 3 Amps. So should be Okay.

As I was finishing up my last post, my wife said the magic words. “Dinner is ready”. So I forgot to mention that in my opinion, clean power includes the 120 VAC 60 Hz (US power) coming into the devices. All my electronic devices are plugged into a CyberPower UPS, or for my entertainment center, a Monster Power HDP 2500 line conditioner. Both eliminate power surges, transient EMF pulses, and in general clean up the incoming commercial power.

Pudge

3 Likes

I just did a stress test on my new EnOS-ARM-GNOME installed just yesterday.
I haven’t got around to order a fan for the device yet so this is with passive cooling (Pimoroni heatsink) and the default /boot/config.txt:

Screenshot from 2022-02-09 21-20-51

The temp went gradually up to 62-63 C and and it never went above that. After 7 minutes I stopped the stress test and the temp fell down pretty rapidly to 52-53. It’s not that horrible, I think. But of course I realize the benefits of a fan and running on cooler temperatures as has been emphasized in the thread.

1 Like

So here I am with the report from some more fiddling and testing. By chance I went by a “brick and mortar” computer shop and picked up

this tiny little fan

3368-04

https://www.adafruit.com/product/3368

It looked quite frail but I was curios to see how it performs. It was also very cheap so not a hard decision to make.

Anyways, I have been watching some videos and reading a bit of the documentation about overclocking and the options in the /boot/config.txt. In one of the videos it was said that according to the manufacturer the cortex-a72 could run with as high a clockspeed as 2500 Mhz (something I couldn’t corroborate doing some half-hearted searching). However, he had only succeeded to get the system stable at 2300 Mhz with the following values in the config.txt:

over_voltage=10
arm_freq=2300

Since I didn’t want to set that high of a value for over_voltage (the recommended range from Raspberry being -16 to 8), I went ahead with he following values:

over_voltage=8
arm_freq=2300

The system came up fine after reboot but 15 to 20 seconds into running the stress test, the system choked up and I had to power it down and re-edit the config file to read:

over_voltage=8
arm_freq=2250

This seems to have worked. After reboot and running the test, no sign of choking or freezing. Of course the temperature goes up but given the fact that the default value is set to 85 C before the processor starts throttling to protect itself, so I found the temp reasonable.

I know this is a rather lame set up compared with what some of you guys are using but here is how mine looks like for now:

RPi-Andafruit-Fan

And here is the part of the /boot/config.txt with my modifications:

# Overclocking
over_voltage=8
arm_freq=2250
gpu_freq=700

####
initial_turbo=60

####
temp_limit=70

Htop showing the CPU usage, clockspeed and temp at idle:

RPi-idle

Running the stress test (stress -c 4 ) for 10 minutes:

10-min-stress

Now running the Pi at 100% CPU usage clocked at 2300 Mhz doesn’t by far correspond to my current usage.

Since using the Pi is quite new to me, I am in a process of trials and errors to learn its capacities and limitations.

I use cpupower to set the cpu power scaling:

$ cpupower frequency-info 

analyzing CPU 0:
  driver: cpufreq-dt
  CPUs which run at the same hardware frequency: 0 1 2 3
  CPUs which need to have their frequency coordinated by software: 0 1 2 3
  maximum transition latency:  Cannot determine or is not supported.
  hardware limits: 600 MHz - 2.30 GHz
  available frequency steps:  600 MHz, 700 MHz, 800 MHz, 900 MHz, 1000 MHz, 1.10 GHz, 1.20 GHz, 1.30 GHz, 1.40 GHz, 1.50 GHz, 1.60 GHz, 1.70 GHz, 1.80 GHz, 1.90 GHz, 2.00 GHz, 2.10 GHz, 2.20 GHz, 2.30 GHz
  available cpufreq governors: conservative ondemand userspace powersave performance schedutil
  current policy: frequency should be within 600 MHz and 2.30 GHz.
                  The governor "schedutil" may decide which speed to use
                  within this range.
  current CPU frequency: Unable to call hardware
  current CPU frequency: 700 MHz (asserted by call to kernel)

I monitor constantly htop and I can see that the CPU oscillates between all the above values depending on the load and actually bursts at its max value of 2300 Mhz when I launch an application like Firefox or stream videos.

I have the impression that the system is quite stable. No sign of freezing or lagging. No issues with streaming videos at 1080. The temp is rather stable between 40-55, seldom above 55 and I have yet to see temps beyond 60 for my current usage which consists of browsing, watching videos locally or streaming, listening to music; average, casual daily usage.

With all that said and done, I would prefer to be in the side of the caution and will be getting one of those nice Noctua fans very soon.

Thanks for reading! Please tell me if I have omitted some information for you to get a more complete picture. Looking forward to your comments, advice and suggestions. Any tips and tricks for a smoother usage of my RPi are highly welcome.

3 Likes

Thanks for sharing your experience and experiments and for going into so much detail. I’ll try to replicate this during the weekend and give feedback on temperatures with overclocking at the levels you suggest while running with the noctua fan.

3 Likes

That would be very nice.
It would serve as a point of reference and for comparison regarding the efficiency of the cooling arrangement.

I am not sure what the more experienced RPi users in EnOS community think of overclocking but all the videos I watched come with a disclaimer of the sort “Do it at your own risk”.

I need to add as well that I didn’t jump up to arm_freq=2250 Mhz and over_voltage=8 at once. I did it step by step to see how the Pi responds. Here are the values for each step:

over_voltage=4
arm_freq=2000
over_voltage=6
arm_freq=2200
over_voltage=8
arm_freq=2250

These might or might not work for you so you need to find the right spot. So far the last one seems to be working nicely in combination with cpu power scaling.

2 Likes

Just FYI

I go with
over_voltage=5
arm_freq=2000
gpu_freq=750

Pudge

2 Likes