Unsuccessful attempts at installing the ARM on SSD

Hi,

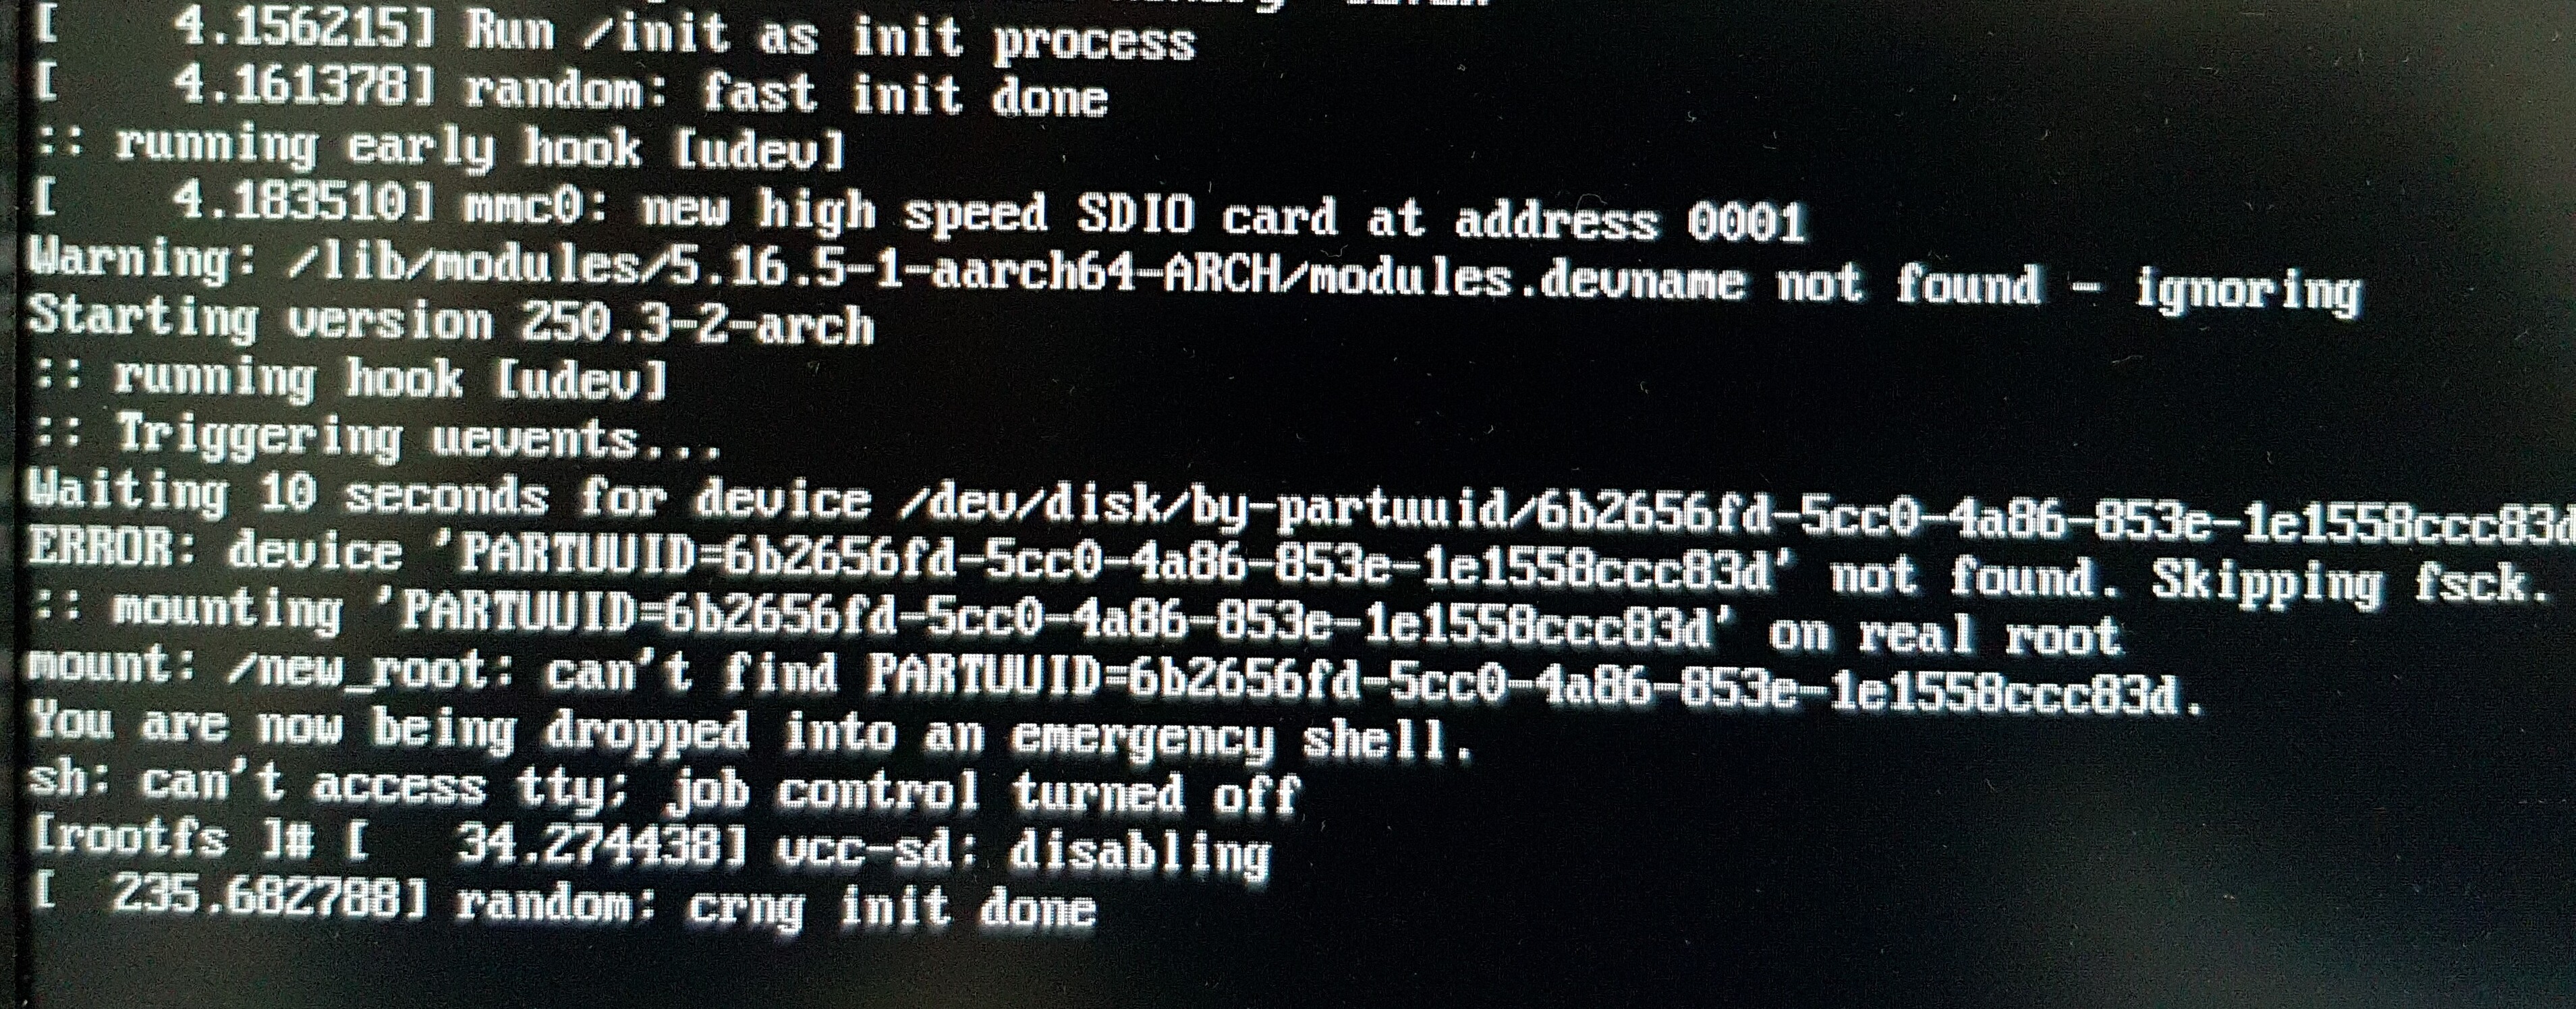
Since yesterday evening I have made several attempts at installing EnOS ARM on a SSD. Unfortunately all of my attempts have been unsuccessful resulting in a non booting system after the initial first step of the installation as can be seen in the picture below:

enos-arm-boot-issue

install-image-V2.5.sh terminal output
Partitioning, & formatting storage device...

Partitioning storage device /dev/sda...

Formatting storage device /dev/sda...

If "/dev/sdx contains a ext4 file system Labelled XXXX" or similar appears, Enter: y


mkfs.fat 4.2 (2021-01-31)
/dev/sda2 contains `ISO-8859 text, with very long lines (65536), with no line terminators' data
Proceed anyway? (y,N) y
Creating filesystem with 29253120 4k blocks and 7315456 inodes
Filesystem UUID: 4805bbfc-9580-4e57-8ebc-c3a4bf9d68f0
Superblock backups stored on blocks: 
	32768, 98304, 163840, 229376, 294912, 819200, 884736, 1605632, 2654208, 
	4096000, 7962624, 11239424, 20480000, 23887872

Allocating group tables: done                            
Writing inode tables: done                            
Creating journal (131072 blocks): done
Writing superblocks and filesystem accounting information: done   

--2022-02-08 13:48:20--  http://os.archlinuxarm.org/os/ArchLinuxARM-rpi-aarch64-latest.tar.gz
Resolving os.archlinuxarm.org (os.archlinuxarm.org)... 50.116.36.110
Connecting to os.archlinuxarm.org (os.archlinuxarm.org)|50.116.36.110|:80... connected.
HTTP request sent, awaiting response... 302 Found
Location: http://de5.mirror.archlinuxarm.org/os/ArchLinuxARM-rpi-aarch64-latest.tar.gz [following]
--2022-02-08 13:48:21--  http://de5.mirror.archlinuxarm.org/os/ArchLinuxARM-rpi-aarch64-latest.tar.gz
Resolving de5.mirror.archlinuxarm.org (de5.mirror.archlinuxarm.org)... 176.9.92.49
Connecting to de5.mirror.archlinuxarm.org (de5.mirror.archlinuxarm.org)|176.9.92.49|:80... connected.
HTTP request sent, awaiting response... 200 OK
Length: 521134082 (497M) [application/octet-stream]
Saving to: ‘ArchLinuxARM-rpi-aarch64-latest.tar.gz’

ArchLinuxARM-rpi-aarch64-latest. 100%[========================================================>] 496.99M  7.95MB/s    in 72s     

2022-02-08 13:49:38 (6.86 MB/s) - ‘ArchLinuxARM-rpi-aarch64-latest.tar.gz’ saved [521134082/521134082]


Untarring the image...may take a few minutes.


syncing files...may take a few minutes.
rm: cannot remove 'MP2/etc/motd': No such file or directory


Almost done! Just a couple of minutes more for the last step.


End of script!

Be sure to use a file manager to umount the device before removing the USB SD reader

The default user is alarm with the password alarm
The default root password is root
$ sudo parted -l 

Model: KINGSTON  SV300S37A120G (scsi)
Disk /dev/sda: 120GB
Sector size (logical/physical): 512B/4096B
Partition Table: gpt
Disk Flags: 

Number  Start   End    Size   File system  Name     Flags
 1      2097kB  212MB  210MB  fat16        primary  msftdata
 2      212MB   120GB  120GB  ext4         primary

Shouldn’t the flags on vfat partition be set to boot,lba (or some such) ?

$ sudo blkid

/dev/sda1: SEC_TYPE="msdos" UUID="6781-6DF6" BLOCK_SIZE="512" TYPE="vfat" PARTLABEL="primary" PARTUUID="66a32aad-3671-4d5c-85d7-b6d6445066af"
/dev/sda2: UUID="4805bbfc-9580-4e57-8ebc-c3a4bf9d68f0" BLOCK_SIZE="4096" TYPE="ext4" PARTLABEL="primary" PARTUUID="6b2656fd-5cc0-4a86-853e-1e1558ccc83d"
/etc/fstab 

# Static information about the filesystems.
# See fstab(5) for details.

# <file system> <dir> <type> <options> <dump> <pass>
/dev/mmcblk1p1  /boot   vfat    defaults        0       0

I edited the fstab to match the actual partitions but still no luck:

# <file system> <dir> <type> <options> <dump> <pass>
UUID=6781-6DF6   /boot vfat  defaults 0 0
UUID=4805bbfc-9580-4e57-8ebc-c3a4bf9d68f0  /  ext4 defaults 0 1
sudo smartctl -H --all /dev/sda
smartctl 7.2 2020-12-30 r5155 [x86_64-linux-5.16.7-zen2-1-zen] (local build)
Copyright (C) 2002-20, Bruce Allen, Christian Franke, www.smartmontools.org

=== START OF INFORMATION SECTION ===
Model Family:     SandForce Driven SSDs
Device Model:     KINGSTON SV300S37A120G
Serial Number:   
LU WWN Device Id: 
Firmware Version: 608ABBF0
User Capacity:    120,034,123,776 bytes [120 GB]
Sector Size:      512 bytes logical/physical
Rotation Rate:    Solid State Device
TRIM Command:     Available
Device is:        In smartctl database [for details use: -P show]
ATA Version is:   ATA8-ACS, ACS-2 T13/2015-D revision 3
SATA Version is:  SATA 3.0, 6.0 Gb/s (current: 6.0 Gb/s)
Local Time is:    Tue Feb  8 14:41:14 2022 CET
SMART support is: Available - device has SMART capability.
SMART support is: Enabled

=== START OF READ SMART DATA SECTION ===
SMART Status not supported: Incomplete response, ATA output registers missing
SMART overall-health self-assessment test result: PASSED
Warning: This result is based on an Attribute check.

General SMART Values:
Offline data collection status:  (0x02)	Offline data collection activity
					was completed without error.
					Auto Offline Data Collection: Disabled.
Self-test execution status:      (   0)	The previous self-test routine completed
					without error or no self-test has ever 
					been run.
Total time to complete Offline 
data collection: 		(    0) seconds.
Offline data collection
capabilities: 			 (0x7d) SMART execute Offline immediate.
					No Auto Offline data collection support.
					Abort Offline collection upon new
					command.
					Offline surface scan supported.
					Self-test supported.
					Conveyance Self-test supported.
					Selective Self-test supported.
SMART capabilities:            (0x0003)	Saves SMART data before entering
					power-saving mode.
					Supports SMART auto save timer.
Error logging capability:        (0x01)	Error logging supported.
					General Purpose Logging supported.
Short self-test routine 
recommended polling time: 	 (   1) minutes.
Extended self-test routine
recommended polling time: 	 (  48) minutes.
Conveyance self-test routine
recommended polling time: 	 (   2) minutes.
SCT capabilities: 	       (0x0025)	SCT Status supported.
					SCT Data Table supported.

SMART Attributes Data Structure revision number: 10
Vendor Specific SMART Attributes with Thresholds:
ID# ATTRIBUTE_NAME          FLAG     VALUE WORST THRESH TYPE      UPDATED  WHEN_FAILED RAW_VALUE
  1 Raw_Read_Error_Rate     0x0032   120   120   050    Old_age   Always       -       0/0
  5 Retired_Block_Count     0x0033   100   100   003    Pre-fail  Always       -       0
  9 Power_On_Hours_and_Msec 0x0032   097   097   000    Old_age   Always       -       3292h+24m+37.760s
 12 Power_Cycle_Count       0x0032   097   097   000    Old_age   Always       -       3766
171 Program_Fail_Count      0x000a   100   100   000    Old_age   Always       -       0
172 Erase_Fail_Count        0x0032   100   100   000    Old_age   Always       -       0
174 Unexpect_Power_Loss_Ct  0x0030   000   000   000    Old_age   Offline      -       1281
177 Wear_Range_Delta        0x0000   000   000   000    Old_age   Offline      -       1
181 Program_Fail_Count      0x000a   100   100   000    Old_age   Always       -       0
182 Erase_Fail_Count        0x0032   100   100   000    Old_age   Always       -       0
187 Reported_Uncorrect      0x0012   100   100   000    Old_age   Always       -       0
189 Airflow_Temperature_Cel 0x0000   028   047   000    Old_age   Offline      -       28 (Min/Max 14/47)
194 Temperature_Celsius     0x0022   028   047   000    Old_age   Always       -       28 (Min/Max 14/47)
195 ECC_Uncorr_Error_Count  0x001c   120   120   000    Old_age   Offline      -       0/0
196 Reallocated_Event_Count 0x0033   100   100   003    Pre-fail  Always       -       0
201 Unc_Soft_Read_Err_Rate  0x001c   120   120   000    Old_age   Offline      -       0/0
204 Soft_ECC_Correct_Rate   0x001c   120   120   000    Old_age   Offline      -       0/0
230 Life_Curve_Status       0x0013   100   100   000    Pre-fail  Always       -       100
231 SSD_Life_Left           0x0000   097   097   011    Old_age   Offline      -       68719476737
233 SandForce_Internal      0x0032   000   000   000    Old_age   Always       -       5120
234 SandForce_Internal      0x0032   000   000   000    Old_age   Always       -       6169
241 Lifetime_Writes_GiB     0x0032   000   000   000    Old_age   Always       -       6169
242 Lifetime_Reads_GiB      0x0032   000   000   000    Old_age   Always       -       10976
244 Unknown_Attribute       0x0000   099   099   010    Old_age   Offline      -       4128812

SMART Error Log not supported

SMART Self-test log structure revision number 1
Num  Test_Description    Status                  Remaining  LifeTime(hours)  LBA_of_first_error
# 1  Short offline       Completed without error       00%      3282         -
# 2  Short offline       Completed without error       00%      3282         -

SMART Selective self-test log data structure revision number 1
 SPAN  MIN_LBA  MAX_LBA  CURRENT_TEST_STATUS
    1        0        0  Not_testing
    2        0        0  Not_testing
    3        0        0  Not_testing
    4        0        0  Not_testing
    5        0        0  Not_testing
Selective self-test flags (0x0):
  After scanning selected spans, do NOT read-scan remainder of disk.
If Selective self-test is pending on power-up, resume after 0 minute delay.

I have wiped out the disk, created a new partition table etc. Nothing seems to have worked.
Please tell me If I should provide more info. I would be grateful for your help to resolve this issue.

I probably shouldn’t say anything about ARM stuff as I’ve never used that. :wink:

But in /etc/fstab, shouldn’t the / partition be declared before /boot partition?
And you have a gpt disk, does that work (without an extra partition) with our ARM install?

1 Like

Here is the function in charge of partitioning the disk from install-image-V2.5.sh:

function partition_RPi4() {
   parted --script -a minimal $devicename \
   mklabel gpt \
   unit MiB \
   mkpart primary fat32 2MiB 202MiB \
   mkpart primary ext4 202MiB $devicesize"MiB" \
   quit
}

I don’t know. I wouldn’t think that it should matter but I can try and report back.

Edit: Not sure if the SSD part still needs to be done manually:

Changing the order of the entries in /etc/fstab didn’t make any difference :slightly_frowning_face:

OK. Sorry to waste your time, I will be silent about ARM. :face_in_clouds:

1 Like

No worries! I appreciate your input! I welcome all the perspective and insights!
:enos_flag:

1 Like

Some updates:

I followed the instructions posted by @Pudge here:

[ARM] Raspberry Pi Kernel update & 64 Bit on SSD

I have succeeded in installing the base system on a SD card and also replaced the Arch kernel with the one from RPi foundation. All is well, the system boots up and I can log in as root or the alarm user.

Next step would be to clone the system into the SSD.

I need to go out for some “real life” errands. When I get back, I’ll go ahead with the rest of the instructions. Will keep you posted.

2 Likes

Back to report that it all worked out fine following literally the instructions for manual installation as per the link posted above.

Thank you all EnOS’ team!
:purple_heart:

3 Likes

Sorry for the late reply. I didn’t get a chance to even boot up my computer until 5 P.M.

If you have gotten the install to work, is there anything I can do to make the instructions clearer?

Out of curiosity, what DE / WM did you choose?

Pudge

1 Like

Hi @pudge!

Thanks for your reply! And for all the work and time you put into making EnOS ARM possible!

I guess the failure was more because of my misunderstanding of the 3-step installation process than unclear instructions.

I went with the manual instructions that you had posted before since I felt the process is a bit more transparent. Once I understood how every piece fits together, it was an smooth ride.

I chose Gnome for this installation, it works just beautifully and boots up around 315-320 MB memory usage. Let them say Gnome is bloat but not on this install :wink:

I will be creating new user accounts to try some of the other DEs/WMs.

If there is anything special you want me to test, just let me know.

1 Like

You mentioned that you used install-image-V2.5.sh to install a base system.
Then:
install-image-V2.5.sh should have copied a script named “RPi4-test-kernel-2” into the / (root) directory.

GitHub site

https://github.com/endeavouros-arm/image-install

Using this stament in install-image-V2.sh at line 261

cp RPi4-test-kernel-2 MP2/root

Next, step would be to put the micro SD into the RPi4 device. Hook up peripherals keyboard, mouse, monitor, Ethernet, and plug the USB SSD device to a USB 3.0 connector.
Power up the RPi4, and log in as root with password “root”.

# ls -l

should show RPi4-test-kernel-2 with permissions for execute.

# ./RPi4-test-kernel-2

should start the script and RPi4-test-kernel-2 will automatically provide prompts to do the following for you:

as per:
https://arm.endeavouros.com/step-2-prepare-base-install-for-eos-install/
The RPi4-test-kernel-2 should do a git clone and copy the final script and files needed to finish the install with a DE / WM of your choice. At RPi4-test-kernel-2 line 252

git clone https://github.com/endeavouros-arm/install-script.git

BTW, I am including line numbers and the script names because I think it is great you are going to the scripts and figuring them out as part of your trouble shooting. :nerd_face:

Next after RPi4-test-kernel-2 script finishes, reboot, log in as root.

# ls -l 

should show a directory named “install-script”

cd into install script and

# ./endeavour-ARM-install-V2.X.sh

should start the script and finish the install.

It is as easy as 1 2 3
https://arm.endeavouros.com/automated-base-install/
https://arm.endeavouros.com/step-2-prepare-base-install-for-eos-install/
https://arm.endeavouros.com/endeavouros-arm-install/

However, by doing it the manual way, you learned a lot more than by just starting scripts and answering prompts.

Pudge

1 Like

While I was typing up the above reply, I did not notice your reply. So I kind of doubled up on some of the explanations.

As for trying some of the other DE / WM don’t forget the micro SD you used to create the USB SSD image is sitting there ready for step 3. You can just boot into it as root and start the script in the install-script directory and have a test install of another DE / WM.

EDIT:
This would also give somewhat an idea of the difference between micro SD and USB SSD speeds.

Pudge

1 Like

That’s great the way you spelled it out here.

The whole thing was just a silly misunderstanding on my part not paying enough attention to the instructions. It is all clear to me now when I am done with the installation through the manual method you had posted before.

In a sense, as you also mention it, it was a good thing that I failed at the beginning.
I learned a couple of important lessons. First of all to pay attention to the instructions and to the content of the scripts (even though I don’t always understand all the syntactic details). And also a bit more about how to work from TTY and within the root directory.

All in all it was a nice learning experience. I am more inclined to learn to do things step-by-step the manual way. In this way I learn more how things work and then after I could move to the automatic way. I guess now if I have a look at the installation scripts I would understand much better what they do and how they do it. Thanks again for everything!

2 Likes

If you ever have any questions about the syntax and/or what a function is doing in my scripts, let me know and I will do my best to explain what’s going on.

With some advice from @Manuel , I am now currently in the process of cleaning up the 3 scripts style wise and making the style of my scripts match the style of Manuel’s. Although I doubt I will ever be as good as the script master.

Coming soon to a mirror near you.

Pudge

2 Likes

Thank you so much for the offer! I appreciate it a lot.
I am sure you are being modest and your scripts are great. Of course we can all do our best to gravitate towards that ever evading goal of perfection. Perhaps perfection is in the very effort at each step of achieving it.

2 Likes

Just got my first linux-rpi kernel upgrade on this install:

[2022-02-10T15:01:30+0100] [ALPM] upgraded linux-rpi (5.15.21-1 → 5.15.21-2)

Worked out just fine!
I am really enjoying my RPi 4B with EnOS-ARM-GNOME.

I had a “flirt” with this device when I bought it some months ago but I really never used it. Now I am just loving it.

:purple_heart: :enos_flag:

3 Likes

Rpi are great fun + useful for what they are . Hope you enjoy the ARM journey :vulcan_salute:

Plus pudge is great teacher :pray:

2 Likes

Just love how he ends every message.

Yes I am beginning to get the idea. Very nice little great piece of hardware.

I saw in the “Share your Desktop” thread that you got yours as well. Congratulations! Wish you nice adventures a well!

Yes, he is! I am so grateful for that.

2 Likes

yes … i try no destory this one :rofl:

2 Likes