EDIT:
The method used in this tutorial has changed. It’s a little easier now, including a script that accomplishes this. The following reflects those changes.
The good folks over at Arch Linux Arm have introduced a couple of new kernels based on the RPi Foundation Linux Kernel.
aarch64 core linux-rpi 5.15.21-1 RPi Foundation patched Linux kernel and modules
armv7h  core linux-rpi 5.15.21-1 RPi Foundation patched Linux kernel and modules
I haven’t played with the linux-rpi 32 Bit version yet. So I am not sure what is going on with that yet. My main interest has been in the 64 Bit version.
There are now two versions of the 64 Bit image.
linux-aarch64
and
linux-rpi
The “linux-aarch64” is the kernel installed by the official base image. However, it is easy to convert over to the “linux-rpi” version. The main attraction for the 64 Bit “linux-rpi” version is the ability to install to a USB SSD, including the RPi 4b 8 GB RAM version. It’s a little convoluted, but it works. If anyone knows how to install “linux-aarch64” to a USB, please let me know.
The following is a tutorial / how to for installing a 64 Bit OS on a RPi 4b 8 GB with the new RPi Foundation kernel. With the option to installing on a USB SSD.
STEP 1 install the base image
Install the 64 Bit OS on a RPi 4b 4GB RAM or 8 GB RAM or RPi 400 device on a micro SD card.
Use the image-install script as per
https://arm.endeavouros.com/automated-base-install/
When you get to the second screen, that offers which type of device to install to:
Choose the third option down “Raspberry Pi 64 Bit”.
After installing the base image, put the uSD card in a RPi4 device.
login as root with a password of “root”
You now have two options to complete Step 2
  You can use the "RPi4-test-kernel-2" to complete step 2
OR
  you can manually install the "linux-rpi to the rpi4, and optionally
  copy the system on the micro SD to an external SSD.
COMPLETE STEP 2 WITH THE SCRIPT
If you choose to compete step 2 by running the RPi4-test-kernel-2 script,
after rebooting the RPi4, log in as root using the password “root”
# ls -l
-rwx-x-x-x-- RPi4-test-kernel-2
# ./RPi4-test-kernel-2
Now follow the prompts to complete step 2.
Manual install of step 2
If you care to edit the mirrorlist and select mirrors close to you, use vi or nano:
# vi /etc/pacman.d/mirrorlist
then find the following lines at the top of the file:
## Geo-IP based mirror selection and load balancing
 Server = http://mirror.archlinuxarm.org/$arch/$repo
add # to the beginning of the second line to comment it out like this
## Geo-IP based mirror selection and load balancing
# Server = http://mirror.archlinuxarm.org/$arch/$repo
Then uncomment (remove the leading #) from the ‘Server =’ line(s)
for servers near you and close and save the file.
If you wish to enable parallel downloads in pacman
# vi /etc/pacman.conf
scroll down to the following line
#ParallelDownloads = 5
remove the leading # and change 5 to the number of parallel downloads you want.
At this time you are running the mainline aarch64 kernel. We need to install the raspberry pi foundation kernel. Don’t forget one can use Copy - Paste to enter the following commands.
# pacman-key --init
# pacman-key --populate archlinuxarm
# pacman -Syy
# pacman -Rns --noconfirm linux-aarch64 uboot-raspberrypi
# pacman -Syu --noconfirm linux-rpi raspberrypi-bootloader-x raspberrypi-firmware git wget rsync parted dosfstools
# git clone https://github.com/endeavouros-arm/install-script.git
Reboot and log in as root. The RPi 4 is now running the
linux-rpi 5.15.21-1 RPi Foundation Linux kernel.
If one lists the contents of the /boot directory, the friendly “cmdline.txt” file will be present.
If the text is pulled towards the right side of the monitor and has space of the left side edit:
/boot/config.txt
and add the following just before the [pi4] line
disable_overscan=1
reboot and log in as root.
Optionally Install the OS to a USB SSD
On a computer with a running Linux Desktop Environment, use Gparted or KDE partition manager to partition your SSD. Of course you can do it the retro way and use fdisk. Set KDE Partition Manager (or Gparted) as such:
Highlight the USB SSD device in the left column.
Be ABSOLUTELY sure you have the correct device highlighted for the USB SSD!
create a new partition table by clicking on “New Partition Table”

Pick GPT and then “Create New Partition Table”.
Click to highlight the unallocated section, Right click on it and click “New”
Fill out the partition entry screen to look as such:
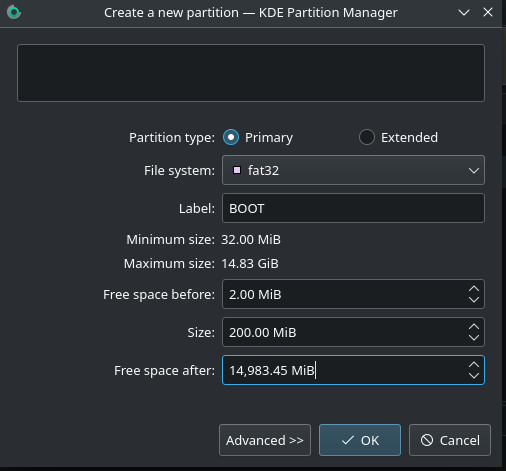
If “free space after” shows zero, click on it and it will auto fill.
Your “free space after” will probably be different depending on the size of the SSD
Click on the bottom unallocated section to highlight it. Right click and choose “New”
Fill out the partition entry screen as follows:
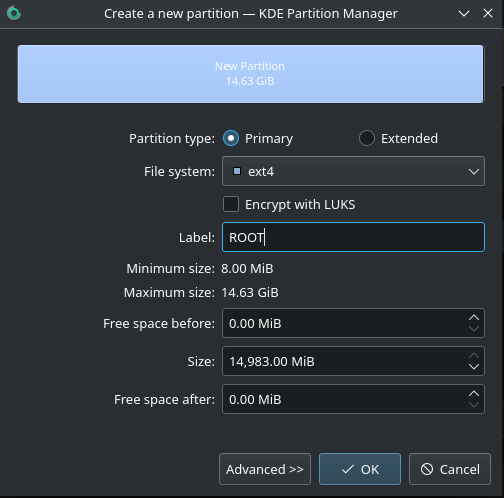
Again, “size” will vary by how big your SSD is.
Click on “Apply”
Once the SSD is partitioned and formatted, unmount it from the computer, and connect the USB SSD enclosure to a USB 3 port on the RPi 4b.
On the RPi4, as root in root’s home directory
pacman -S rsync
mkdir rpi4-copy
cd rpi4-copy
mkdir usb-boot usb-root
lsblk -f
lsblk should show sda listed and mmcblk0p1 listed. The sda device should be the SSD
mount /dev/sda1 usb-boot
mount /dev/sda2 usb-root
To copy the microSD system to the USB SSD
rsync --info=progress2  -axHAX  /boot/  usb-boot/        (the slashes are important as is)
rsync --info=progress2  -axHAX  /  usb-root/
sync
lsblk -f
If you didn’t do it before, write down the UUID for sda1, should be in the format XXX-XXX and for the UUID for sda2.
They will be used in the following configurations.
vi usb-root/etc/fstab
comment out existing by adding # in the beginning
# /dev/mmcblk0p1 /boot vfat defaults 0 0
create new entry
UUID=XXXX-XXXX /boot vfat defaults 0 0 ( XXXX-XXXX is the UUID for sda1)
edit the /boot/cmdline.txt file
vi usb-boot/cmdline.txt
at the beginning of the line, change from
root=/dev/mmcblk0p2
to
root=UUID=xxxxxxxx-xxxx-xxxx-xxx-xxxxxxxxxxxx (using the UUID for sda2)
Check the prompt, should show
[root@alarm rpi-copy]#
if not cd /root/rpi-copy
umount usb-boot usb-root
poweroff and remove the micro SD from the RPi4 and reboot from the SSD
Save the uSD card so if you want to reinstall, put the uSD card in the RPi 4
boot it up, then start with the section of this tutorial where the OS is
copied to a partitioned and formatted USB SSD. Then pacman -Syu and
you have a good base for a new DE or WM.
STEP 3 INSTALL Desktop Environment or Window Manager
Now install any DE or WM of your desire using the “endeavour-ARM-install-V2.6.sh” script.
# ls -l
install-script (directory containing the install script)
# cd install-script
# ls -l
should show endeavour-ARM-install-V2.6.sh with execute permission and other support files.
# ./endeavour-ARM-install-V2.6.sh
follow the prompts