After a long time and thanks to trial and error I managed to get Howdy working on EndeavourOS and you can too! ![]()
Step 1: Howdy AUR.
Just install the Howdy’s AUR package the way you want, in my case I install it with pamac.
Step 2: Identify which is your login manager.
In my case I use KDE so I have Sddm, but in your case you may use LightDM, xcreenaver, sudo, etc.
Step 3: Pam.py files.
The next step and the most confusing is the Pam files, on the github page it says that you should follow Howdy’s Arch page where it says to modify any Pam configuration file, really what is meant here is that you must modify exactly the Pam.py file that you need in your particular case.
How do I know which one to modify?
For that has been step 2! in my case it is /etc/pam.d/sddm because I use Sddm, but in your case it can be:
-
LightDM:
/etc/pam.d/lightdm -
Sddm:
/etc/pam.d/sddm -
Sudo:
/etc/pam.d/sudo -
xscreenaver:
/etc/pam.d/xscreensaver
Use your favorite editor to add the line of code auth sufficient pam_python.so /lib/security/howdy/pam.py just below the first line of code which is usually #%PAM-1.0 but it can vary, its not important for what we want.
We also need to add auth sufficient pam_unix.so try_first_pass likeauth nullok In order to use either a password or a face, this line must be on top of the file.
In my case I have used Kate and it has turned out like this:
#%PAM-1.0

auth        sufficient  pam_unix.so try_first_pass likeauth nullok
auth        sufficient  pam_python.so /lib/security/howdy/pam.py
auth		include		system-login
-auth		optional	pam_gnome_keyring.so
-auth   optional  pam_kwallet5.so

account		include		system-login

password	include		system-login
-password	optional	pam_gnome_keyring.so use_authtok

session		optional	pam_keyinit.so force revoke
session		include		system-login
-session		optional	pam_gnome_keyring.so auto_start
-session  optional  pam_kwallet5.so auto_start
//////////////
From this moment on, the steps are simply to follow the Arch page since the worst is over, but I will continue explaining so that you do not get lost in any case.
//////////////
Step 4: Find your IR sensors.
This is what will be used to detect your face, it can be just the normal camera, the specific light/depth sensors or even both, it all depends on your hardware.
The sensor can be identified by several programs, the ones recommended in the Arch guide are Cheese, fswebcam and v4l-utils, in my case trying each one I saw that by default I have the latest one installed so its the one I will use.
When opening the command terminal I entered v4l2-ctl --list-devices getting the following output:
USB2.0 HD UVC WebCam: USB2.0 HD (usb-0000:0b:00.0-1):
        /dev/video0
        /dev/video1
        /dev/video2
        /dev/video3
        /dev/media0
        /dev/media1
Now you will say, and what does all this mean? good question, the answer is that everything varies, there is no sensor that is always correct because we all have different hardware, so it will be trial and error, I can only tell you that normally one of the first lists is usually the correct one.
For now save all the result because it will be needed in the next step
Step 5: Trial and error to add the correct IR sensor
Now we have to tell Howdy what sensor we want it to use, this part is fun but if you have a lot of sensors maybe it wouldn’t be so much.
We have to open the howdy configuration file with the editor we want, we will find it in the following path: /lib/security/howdy/config.ini
(I recommend to run the command sudo howdy config to get in easier)
Inside we will find many options that we can configure to our liking, I recommend you take a look at it later.
We will look for the line of code that contains the following: device_path = null and we will change “null” for each of the /dev/videoX that we have previously found.
In my case /dev/video1 activates the camera and /dev/video2 activates the sensors, so I decided to use video2. It should look like this:
# The path of the device to capture frames from
# Should be set automatically by an installer if your distro has one
device_path = /dev/video2
Save the changes, it will probably ask you for your password.
Step 6: How can I know what each sensor does?
This step goes along with the previous one of trial and error, what we will do is use a tool that Howdy gives us to test that everything works well, in this way we will test the various /dev/videoX that we have.
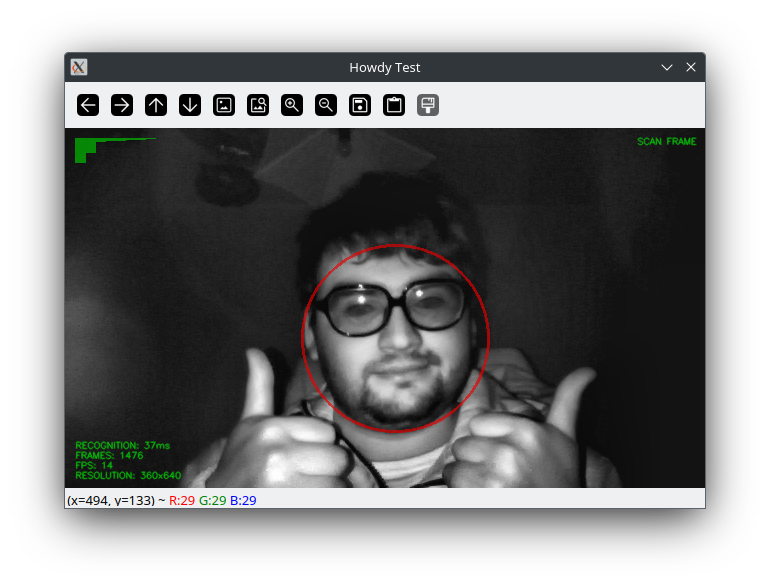
We have to go to the command terminal and type sudo howdy test
After writing our password, a tab opens that shows what Howdy will see when it tries to unlock your device, if it doesn’t show anything, you will have to change the path to another from the list, good luck with that.
Note: the tab is closed by pressing ctrl+C in the command terminal.
As I said before, I discovered that /dev/video2 triggered my device’s sensors.
Hello, it’s a pleasure!
Step 7: Add your beautiful face.
Just run sudo howdy add in the command terminal, enter your password, type a name for the face model you are going to register and remember to look at the camera saying cheese!! ![]()
CONGRATULATIONS
Now you can use Howdy to log in, remember to check the configuration file because you can make the program take photos of people who fail to log in. ![]()
To use Howdy simply try to log in leaving the password field blank.
TIPS
-
If you use KDE, you most likely have “KDE lock screen” that behaves differently from the login manager, so to use Howdy every time you lock the session you must run the following command:
sudo chmod -R 755 /lib/security/howdyand reboot. -
THIS IS NOT RECOMMENDED IN SECURITY TERMS (But it is your GNU/Linux system and you can customize it however you want).
You can activate howdy whenever root permissions are needed, for example when updating system/applications or typingsudoin the command terminal (suis not included).
To do this we must put the same lines of code as in step 3>
(auth sufficient pam_unix.so try_first_pass likeauth nullok
auth sufficient pam_python.so /lib/security/howdy/pam.py)
in the same way but in the file/etc/pam.d/system-auth. -
Make sure you have the howdy config file with
capture_successful = falsebecause we don’t want to fill a folder with photos every time we log in… maybe you do want to but… I’ll leave it to your choice.
I deserve a ![]() and you know it, if this has helped or interested you, like this post!
and you know it, if this has helped or interested you, like this post!
–
making it a wiki, in case someone edit to add info or change on any changes needed, add a note to your edit.