Configure vanilla XFCE to EndeavourOS theming and configuration.
It is simple to do as no configuration files need to be edited, it’s all done with GUIs.
All configuration is done with Xfce4 Version 4.2 and in x11.
INDEX
- Remove the Bottom Panel and reposition the Top Panel
- Modify the Whisker Menu
- Modify the Work Space selector
- Adding apps to the panel and rearranging the Apps order
- Original Panel set up
- Using EndeavourOS backgrounds
- Finished product
Remove the Bottom Panel and reposition the Top Panel
Scroll mouse cursor to the middle of the bottom panel, then right click.
highlight Panel then click on Panel Preferences
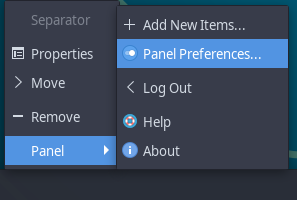
the Panel Preferences window should appear.

- Make sure that Panel 2 is selected
- Click on the Minus button
The Bottom panel will be removed. - Next, Move the Top Panel to the bottom of the screen
Click on Lock Panel to unlock the panel’s position. At the ends of the panel, a
vertical column with two rows of tiny dots appears. These are referred to as handles.
Hover the cursor over a handle, Click and hold then slowly drag the panel to the bottom.
Click on Lock Panel to lock the panels bottom position. - Use Row size (pixels): to adjust the height of the panel. I prefer 30 but choose whatever you like.
Close the Panel Preferences window.
Modify the Whisker Menu
Hover the cursor over the Whisker Menu, right click on it, and click on properties.
Notice before we right clicked on the panel and chose Panel Preferences which gives the preferences for the entire panel as a whole. Right click on a module, then click on Properties yields the preferences of the selected module.
GENERAL TAB

The nice thing about modifying the Whisker Menu is that all changes are immediate.
You can bring up the menu, and look at how is configured. Make a change and bring up a new menu to observe the results. We are only going to change one item on this tab.
Click on Show as list
APPEARANCE TAB
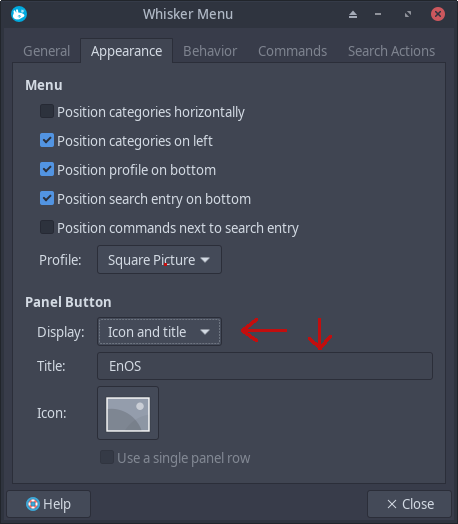
The only thing we will change on this tab is Icon and title It has three settings: “Icon and title” or “Title” or “Icon”. Select all three and see immediate results. Choose what you prefer. If you choose something that includes “Title” then edit Title to your preference. I prefer EnOS.
BEHAVIOR TAB

Bring up a Whisker Menu. Scroll the cursor up and down in the left column, the right column does not change and you must click on a group to see the contents.
Enable Switch categories by hovering. Now see the difference.
Modify the Work Space selector
Hover the cursor over the Work Space selector, and right click. Then select Properites.

- Change Appearance from Miniature View to Buttons
- Enable Switch workspaces using the mouse wheel
- Click on Workspace Settings…
Under Names triple click on and edit from “Workspace 1” to “1” with no leading space, then be sure to press Enter. Do the same with other three Workspace names.
As soon as the last Workspace Name is completed, you should see the results on the panel.
Adding apps to the panel and rearranging the Apps order
To add an App such as Firewalld or Screenshot, open Whiskers Menu, then hover the cursor over the desired app. In this case we will add Firewall. Right click on Firewalll.
Click on + Add to Panel. You will notice it puts the new App icon at the extreme right of the panel.
Right click in the middle of the Panel, then Panel and Panel Preferences
Select the Items Tab

Lets move it so it is right after the workspace switcher as in the classic EndeavourOS theming. Click on the Firewall icon. Now click on the up or down arrows in the upper right to position the Firewall icon to where you want it on the panel.
Position the Firewall icon so it is between Status Tray Plugin and Separator.
My preference is to have in order Firefox, File Manager, Xfce Terminal. So I can click on Firefox and use the UP and Down arrows to position it before File Manager. Should look like this.
![]()
The only thing missing on the panel from the prior EndeavourOS theming is glances positioned just after Xfce Terminal. Hint.
Original Panel set up
If ever you mess up the panel and need to restore it. Here is the default Panel Preferences Items list.
Separator with no expand
Whisker Menu
Separator with no expand
File Manager
Xfce Terminal
Firefox
Separator with no expand
Window Buttons
Separator with expand
Workspace Switcher
Separator with no expand
Status Tray Plugin
PulseAudio Plugin
Power Manager Plugin
Notification Plugin
Separator with no expand
Clock
Separator with no expand
Action Buttons
To see if a separator is with expand or no expand, highlight the Separator, then click on the Edit the currently selected items icon and look to see if Expand is checked or not.
Using EndeavourOS backgrounds
If working with an ARM device, the kind, generous, and handsome ARM development team included four EndeavourOS backgrounds to play around with.
If you are working with a x86_64 device, then you will need to round up 1 to four background images and put them in the official Xfce background folder.
/usr/share/backgrounds/xfce/
With Workspace 1 active, right click on the desktop, and select Desktop Settings…

In the lower right corner is Apply to all workspaces. If you want the same background on all workspaces, leave it checked. If you want different backgrounds in each workspace, uncheck Apply to all workspaces.
If checked, Wallpaper for my desktop will appear in the upper left.
Choose one background image that appear on all workspaces.
If unchecked, Wallpaper for 1 will appear in the upper left.
Choose one background image for workspace 1
Right Click on the upper window panel, click on Move to Another Workspace and select 2. Then select workspace 2 in the workspace chooser.
Choose a background image for workspace 2
Rinse and repeat for workspace 3 and workspace 4.
Finished product

Pudge