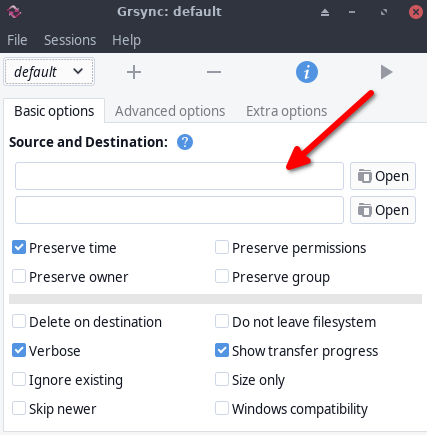
As you can see under Grsync you can select only one source folder. If I created one folder & then store all my data inside that folder and sub folders then Grsync works flawlessly but this method is not really practical.
So my question is if I have multiple (10-15) source folders how do I use Grsync to backup all them at once ?
Next to the drop down menu in your screenshot titled “default” there is a plus/minus buttons to add/remove additional sessions. So generally I leave the default alone, then add a new session by clicking the plus sign, label it something like Music, and direct it from my Music folder source to my backup location. And simply repeat this step for other folders you want. In my case I had 4 separate options I created for Music, Videos, Downloads, and Miscellaneous, but you can of course choose whatever you need to backup, this is just an example to help explain the process. Hope this was helpful.
2 Likes
Okay, I followed your instructions & created a total of 4 sessions & it worked. Just one more thing. Problem is I have to select one session at a time & wait for the backup process to complete & then select the next session. Is it possible to automate this process ? I mean when I click on “Make a full run” I want Grsync to run all sessions one after the other.
There might be a way to do that, the backend rsync is very powerful and configurable, but my experience in that department is about zero unfortunately. I simply did what you mentioned in that whenever I did backups, I had to select each one at a time and run them individually. There is a tab called “Extra Options” that may allow you to add additional commands after a sync is done, to move on to another session, but like I said my experience in that is zero, but if you try searching for something like that, hopefully some relevant answers turn up.
You could check Grsyncs website where they posted some additional reading for setups:
https://www.opbyte.it/grsync/#resources
And if that doesn’t turn up much, you can look through Rsync’s manual, just be warned it’s a hefty amount of information:
https://linux.die.net/man/1/rsync
@Scotty_Trees
Its very easy. I did it without any help.
This is what you need to do.
- Open Grsync
2)Go to the File Menu
- Click on Rsync command line
- Copy the line & paste it in a text document
Repeat this process for all your profile
- Add #!/bin/bash to beginning off the file
- Launch a terminal window. cd into the folder where your script is & run
./nameoffile
2 Likes
I actually don’t use Grsync anymore myself ever since I started using Pika Backup and Timeshift, but it’s good to know there’s a relatively easy way to do it that process, definitely good on ya for finding it out 

