I’m sorry i didn’t provide enough information.
I created the array by running the following : sudo mdadm --create --verbose /dev/md0 --level=5 --raid-devices=3 /dev/sdb /dev/sdc /dev/sdd
When creating a RAID-5 array with MDADM, it starts in a degraded state, I guess it does this because of parity data that has to be setup beforehand, the array can be accessible while this occurs.
When the array was accessible, I just had to mount it normally with sudo mount /dev/md0 /media/RAID
My /etc/mdadm.conf contains the following :
# mdadm configuration file
#
# mdadm will function properly without the use of a configuration file,
# but this file is useful for keeping track of arrays and member disks.
# In general, a mdadm.conf file is created, and updated, after arrays
# are created. This is the opposite behavior of /etc/raidtab which is
# created prior to array construction.
#
#
# the config file takes two types of lines:
#
#       DEVICE lines specify a list of devices of where to look for
#         potential member disks
#
#       ARRAY lines specify information about how to identify arrays so
#         so that they can be activated
#


# You can have more than one device line and use wild cards. The first
# example includes SCSI the first partition of SCSI disks /dev/sdb,
# /dev/sdc, /dev/sdd, /dev/sdj, /dev/sdk, and /dev/sdl. The second
# line looks for array slices on IDE disks.
#
#DEVICE /dev/sd[bcdjkl]1
#DEVICE /dev/hda1 /dev/hdb1
#
# The designation "partitions" will scan all partitions found in
# /proc/partitions
DEVICE partitions


# ARRAY lines specify an array to assemble and a method of identification.
# Arrays can currently be identified by using a UUID, superblock minor number,
# or a listing of devices.
#
#       super-minor is usually the minor number of the metadevice
#       UUID is the Universally Unique Identifier for the array
# Each can be obtained using
#
#       mdadm -D <md>
#
# To capture the UUIDs for all your RAID arrays to this file, run these:
#    to get a list of running arrays:
#    # mdadm -D --scan >>/etc/mdadm.conf
#    to get a list from superblocks:
#    # mdadm -E --scan >>/etc/mdadm.conf
#
#ARRAY /dev/md0 UUID=3aaa0122:29827cfa:5331ad66:ca767371
#ARRAY /dev/md1 super-minor=1
#ARRAY /dev/md2 devices=/dev/hda1,/dev/hdb1
#
# ARRAY lines can also specify a "spare-group" for each array.  mdadm --monitor
# will then move a spare between arrays in a spare-group if one array has a
# failed drive but no spare
#ARRAY /dev/md4 uuid=b23f3c6d:aec43a9f:fd65db85:369432df spare-group=group1
#ARRAY /dev/md5 uuid=19464854:03f71b1b:e0df2edd:246cc977 spare-group=group1
#


# When used in --follow (aka --monitor) mode, mdadm needs a
# mail address and/or a program.  To start mdadm's monitor mode, enable
# mdadm.service in systemd.
#
# If the lines are not found, mdadm will exit quietly
#MAILADDR root@mydomain.tld
#PROGRAM /usr/sbin/handle-mdadm-events
ARRAY /dev/md0 metadata=1.2 name=workstation:0 UUID=da704113:fed1f5e0:dde9edc1:d6163825
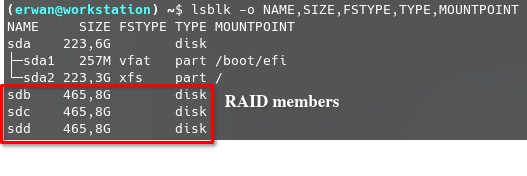
the output of fdisk -l /dev/sda (My boot drive) is :
Disk /dev/sda: 223,57 GiB, 240057409536 bytes, 468862128 sectors
Disk model: PNY CS900 240GB
Units: sectors of 1 * 512 = 512 bytes
Sector size (logical/physical): 512 bytes / 512 bytes
I/O size (minimum/optimal): 512 bytes / 512 bytes
Disklabel type: gpt
Disk identifier: 8F187E81-96BB-40C0-81F0-B8C9DC1323C0

Device      Start       End   Sectors   Size Type
/dev/sda1      34    526335    526302   257M Microsoft basic data
/dev/sda2  526336 468862094 468335759 223,3G Linux filesystem
Array member 1 : fdisk -l /dev/sdb
Disk /dev/sdb: 465,76 GiB, 500107862016 bytes, 976773168 sectors
Disk model: WDC WD5000AZRX-0
Units: sectors of 1 * 512 = 512 bytes
Sector size (logical/physical): 512 bytes / 4096 bytes
I/O size (minimum/optimal): 4096 bytes / 4096 bytes
Disklabel type: gpt
Disk identifier: 93BCB3C2-4937-4158-A061-3585382E0DC4
Array member 2 : fdisk -l /dev/sdc
Disk /dev/sdc: 465,76 GiB, 500107862016 bytes, 976773168 sectors
Disk model: WDC WD5000AZRX-0
Units: sectors of 1 * 512 = 512 bytes
Sector size (logical/physical): 512 bytes / 4096 bytes
I/O size (minimum/optimal): 4096 bytes / 4096 bytes
Disklabel type: gpt
Disk identifier: 672165B1-475A-485C-B0E0-AF80A36D8BA1
Array member 3 : fdisk -l /dev/sdd
Disk /dev/sdd: 465,76 GiB, 500107862016 bytes, 976773168 sectors
Disk model: Hitachi HDS72105
Units: sectors of 1 * 512 = 512 bytes
Sector size (logical/physical): 512 bytes / 512 bytes
I/O size (minimum/optimal): 512 bytes / 512 bytes
Disklabel type: gpt
Disk identifier: DC98F1A0-3268-4971-A6E5-0AF98D66AC9B
I added the --verbose flag and this is what the command returns :
mdadm: looking for devices for /dev/md0
mdadm: No super block found on /dev/sdd (Expected magic a92b4efc, got 00000000)
mdadm: no RAID superblock on /dev/sdd
mdadm: No super block found on /dev/sdc (Expected magic a92b4efc, got 00000000)
mdadm: no RAID superblock on /dev/sdc
mdadm: No super block found on /dev/sdb (Expected magic a92b4efc, got 00000000)
mdadm: no RAID superblock on /dev/sdb
mdadm: No super block found on /dev/sda2 (Expected magic a92b4efc, got 33424149)
mdadm: no RAID superblock on /dev/sda2
mdadm: No super block found on /dev/sda1 (Expected magic a92b4efc, got 00000000)
mdadm: no RAID superblock on /dev/sda1
mdadm: No super block found on /dev/sda (Expected magic a92b4efc, got 00000000)
mdadm: no RAID superblock on /dev/sda
I am willing to be more precise if you need me to.