Balena etcher writes the '.iso onto the USB stick. That takes some time and needs to be validated afterwards.
In case of ventoy, there is no need for that process. Just copying the '.iso file onto the usb stick will do. And you could copy over several '.iso files, making a bootable media that supports several different operating systems.
Thus, in short, balena etcher would make a single purpose usb install media. And ventoy can create a multitool, so to say.
Balena Etcher and Rufus do the same thing–they “burn” the .iso file to a USB stick and make it bootable. The finished stick is your installation media. I prefer Rufus because it doesn’t need to be installed–you just run it, but either program will get the job done.
As a general outline, install windows first, then use MS Disk Management GUI to shrink the C: partition to make room for Linux. When you install Linux, it will modify the efi partition making both Windows and Linux bootable. There are dozens of YouTube videos that will walk you through the process–watch a few. I’ve done this dozens of times since 2018 and it has always worked. Even the first time I tried it (2018) when I didn’t know what I was doing it worked, and it didn’t corrupt my Windows. Even so–back up all your Windows files or create a backup image of your Windows drive BEFORE you set up dual boot! Good luck, and kindly let us know how it turned out. Cheers.
Hi, again!
I watched this tutorial (https://www.youtube.com/watch?v=xFLrBolhHDw) and it seems pretty straight forward. On the EndeavourOS website I see the mirror list with all the different files. In the tutorial he downloads and uses the ISO. What are Sha512sum and GPG sig file for? Also, out of all the ISOs I can choose from, should I go for the one closest to my country or is there something else I should consider when choosing?
sha512sum is for validating the ISO. If both checksums are identical, it means the file is signed by original developers, hence authentic. GPG file signature serves similar purpose.
I tend to use the one closest to my country, although I have no clue if that makes any difference.
These are used to verify the ISO you have is genuine, not tampered with, and without faults.
In the simplest form - you can compare the provided sha512 value with the output of
sha512sum /path/to/endeavouriso.iso
And some extra notes..
Always take any information on the internet with some healthy dose of salt.
This is generally true, more true in spaces like youtube, and even more so when talking about niche/expert topics such as linux.
In this case the ‘tutorial’ presents a few problems, though none of them exactly ‘dire’.
Balena etcher is spyware. Theres no 2 ways about that. It seems to generally work and be easy to use. But its most of a chrome browser for writing an ISO file (hugely overkill for its expressed purpose) and its filled with adverts and tracking code.
The guide does not really explain any of the software choices and generally chooses defaults.
The tutorial fails to mention or inform about an ESP ( EFI System Partition ) and indeed is using a legacy-bios setup. Likely your situation will look slightly different. More or less you should know, if dual booting, to choosebut not format the existing ESP. This will be a smaller fat32 partition at the beginning of the table.
The guide then goes on to choose ‘No SWAP’. This is very much not how you will want your system to be. But it is an acceptable selection if you make sure to set up SWAP after the installation. This approach would really only be desirable if your preferred SWAP setup is not provided by the installer - such as ZRAM which is actually cache in RAM and requires no additional SWAP partition. However you do it you want SWAP or an alternative.
They dont seem to actually understand how package management works. Their method of searching is clunky and unnecessary. Futhermore, especially if you dont know how the things work, just use pacman -Syu whether updating the whole system or installing a new package.
Ex: sudo pacman -Syu OR sudo pacman -Syu firefox
It does an OK job of giving visual representations of how things will look - from the installation procedure to the resulting desktop. Its just not that great of a guide. The definitive sources of information will always be the documentation - those from EndeavourOS or its parent Arch.
Is it neccessary to validate the files with the Sha512sum or GPG sig file when downloading from the official site?
More or less you should know, if dual booting, to choosebut not format the existing ESP. This will be a smaller fat32 partition at the beginning of the table.
Will this be in the “Partitions” section of the Endeavour installer?
The guide then goes on to choose ‘No SWAP’. This is very much not how you will want your system to be. But it is an acceptable selection if you make sure to set up SWAP after the installation. This approach would really only be desirable if your preferred SWAP setup is not provided by the installer - such as ZRAM which is actually cache in RAM and requires no additional SWAP partition. However you do it you want SWAP or an alternative.
Where in the tutorial does it show this? And would you mind dumbing it down a little, lol.
Yes.
If you are wiping everything and installing eos then you can just let the automatic installer do its thing.
If there is an existing system you want to preserve (making a dual-boot) and its a UEFI system (something built in the last 2 decades or so).. then there will already be an existing ESP - which you will want to ‘choose’ to put your boot files into, but not format because you dont want to lose the other OSs boot files. This would all relate to the partitioning section after selecting grub at about 4:18.
So this would be more verbose if ‘manual’ partitioning or similar is used. Much the same as the ESP stuff above. In the video they choose ‘Erase disk’ (meaning deleting everything already there and just putting eos), and after that selection there is a subsequent box that appears below for the SWAP option, right next to an option for the filesystem format of the main (root) partition.
This presents in the guide at about 4:20 as No Swap ∨ext4 ∨
PS
I forgot to mention. If you are dual-booting with windoze .. make sure to disable Fast Startup .. this is a misleading feature that actually ensures windoze hibernates instead of shutting down. It is especially important to disable this feature in order for other operating systems to have full access to the hardware and function correctly.
I think I misused “dual-booting” in my original post. I already have a drive designated to Windows and I plan on emptying another drive and dedicate that one to EOS. I’m assuming I should still choose “Swap” and I’m not really sure what do do for the box next to it.
But makes it substantially less likely you might accidentally bump or overwrite the existing data.
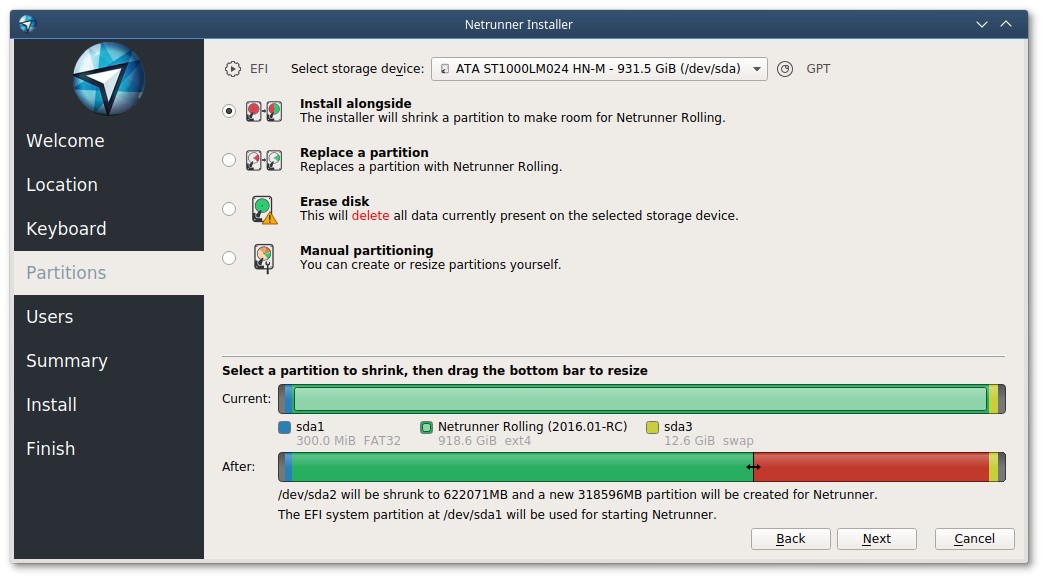
Calamares (the installer) has been around for a while and has changed a bit over time .. so I spent a little time trying to find decent reference screenshots.
Notice in both examples the bottom that states ‘The EFI system partition … wil be used …’.
Now again it will look a little different, and available options and so forth will change slightly if using different methods of ‘erase’, ‘replace’, ‘alongside’, or ‘manual’.
What I was trying to communicate was the general idea of the ESP;
mostly that you dont want to destroy the existing one
you can, and often may prefer, to use and share a single ESP for many OSs.
But I may also add that, especially given the multiple disks, you do have the option to keep separate ESPs .. one for win .. one for linux, each living on their respective disks. But that will mean you will either need to use EFI/BIOS to select the different OSs at boot (rather than having the bootloader just present you with the options of the many OSs) .. or some fancy/involved chainloading to string them together.
Unless there is some sort of security concern I would normally opt to have a shared ESP and easily choose my OS from the bootloader after power on. Instead of needing to smash F12 for EFI menu.
But maybe you fancy the idea of being able to just pull out the disk and drop it somewhere else .. this and other scenarios are examples where you might find value in having an ESP on each disk.
I understand. I think I’d rather have a shared ESP so I can choose my OS from the bootloader. And just to be clear the most optimal way of doing this in the partitions section isss…?
I am not sure how calamares will present today with multiple disks.
Its quite possible that in order to achieve the described state
(OSs on different disks, shared ESP on first or other disk)
you would need to do the manual partitioning.
..I’ll fire up an ISO real quick to double check.
And it looks like that is true.
So the approach, should you choose to use it, would look something like:
Regular setup with timezone, etc.
Partitioning > Manual partitioning
On the partition editor (next) page;
Select the populated disk at the top of the section.
You should now see the exisiting fat32 ESP, likely at the beginning.
Selecting the ESP, ‘edit’ it and set the mount point to /boot/efi and Do Not Format.
There will be a checkbox to format, but do not select it, we only want to set the mount point!
(We also want ensure some flags, which should be automatic, but will double check later)**
Now select the empty/destructible disk at the top of the section.
You now have options for how to organize this disk, but the simplest is just one giant / (‘root’) partition. This is acceptable due to the shared ESP, and if we assume ZRAM post-install. The root partition can be almost any filesystem you want .. the basic/standard is ext4 and thats what I would suggest unless you want fancy features like automated backups from somethign like btrfs
If you want to create a SWAP partition then include that next to / - the same size as your RAM if you intend to use hibernation.
When the installer finishes we can double check your flags.
Open up gparted any which way, such as from the Hello/Welcome app.
We want to see boot and esp on that ESP partition. If they arent there then add them.
I would Highly recommend not doing this. Microsoft is NOTORIOUS FOR overwriting the boot device on updates. Microsoft will not respect YOUR boot and will overwrite it at will.
Yes. Microsoft also can apparently remove your Linux entry from your UEFI during its updates so be careful. Personally I would just remove Microsoft and never look back. Oh wait I already did
It does not though.
Some EFI updates may knock out the order or even the entry .. but I have yet to see an example of the files on the ESP actually being deleted.
Its the same every time this is brought up.
I agree its annoying but misrepresenting the issue does not help.
By the way .. if this does happen, you can do the following;
many of examples of where it has. I admit I don’t keep up with MS or any problems one usually have with it. but I have seen tons of people complain about Linux boot being removed after a windows update so I can only go on what they report.