Installing EndeavourOS Arm on a SBC (Single Board Computer) is a two step process. First I think we need to discuss the EnOS philosophy towards Arm. I think this will clear up a lot of confusion.
Our process does not have a ISO image with a complete OS and Desktop Environment that you just use etcher to transfer it to a uSD and voila you have a working system. We don’t do that because we would need to have ISOs for every SBC and Desktop Environment combination we choose to support. An image for an Odroid N2 is not transferable to a Raspberry Pi 4. So to support Raspberry Pi 4b with complete OS and DE ISO images for both Xfce4 and Gnome would require two ISOs. To do the same for Odroid N2 would require another two ISOs for a complete OS and DE for Xfce4 and Gnome. We are now up to 4 ISO images. We still have 6 other DEs that EnOS supports so we’re up to 16 ISOs for two SBCs and and eight DEs. Obviously, EnOS does not have the man power to do that. Go to the download section of a website for a distribution that a lot of you know and love. You will find four OS & DE offerings for Raspberry Pi of i3, KDE Plasma, XFCE, and Sway, which are four separate ISO images. Plus you get what they decide to give you.
Here at EndeavourOS, we let you choose any device that Archlinux Arm supports. Archlinux Arm provides an image for a base Archlinux install. This install is like a base Archlinux x86_64 install done per the Arch Way. No x11 or other graphics layers, no window manager, no Desktop Environment. Just a base Linux.
Archlinux Arm does a fantastic job of maintaining base images for quite a few SBCs.
Then on top of base Linux install, EnOS offers one script to rule them all, that installs EndeavourOS and a choice of 8 vanilla Desktop Environments. Now we at EnOS only have one script to maintain, which is very doable. The user gets a ton of choices and decides what the user wants to add to the vanilla DE.
The first step to install EnOS is to use a working x86_64 Linux computer to install a base Archlinux Arm install on a uSD card or eMMC card. The second step is to put the uSD card into your SBC and install the graphics layers, window managers, and a DE.
There are three ways to install the Archlinux Arm base install image on a uSD or eMMC card.
The first way is the Arch Way.
For a RPi4, go to the archlinuxarm.org site, hover on “Platforms” then “ARMv8” then “Broadcom” and finally click on “Raspberry Pi 4”.
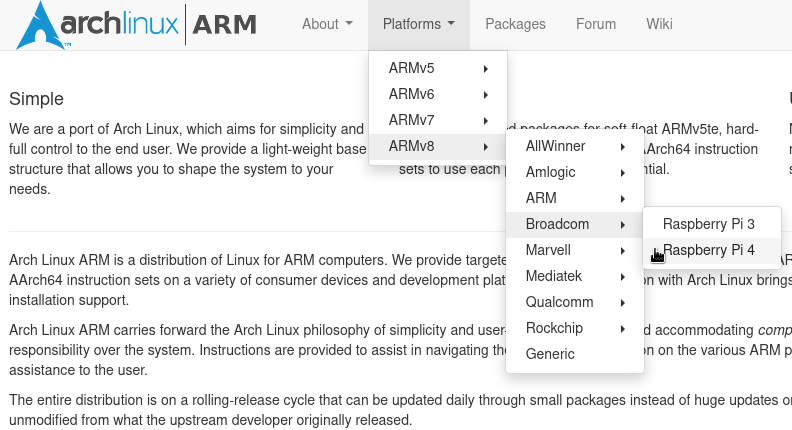
Anything in Platform ARMv5 or ARMv6 will not likely give good results for a full blown OS and DE. But even with just ARMv7 (32 bit) & ARMv8 (64 bit) there are a lot of possibilities there. After clicking in Raspberry Pi 4, you will get the next window. Click on the “Installation” Tab and here are the instructions for installing an Archlinux Arm base on a uSD. RPi4 does not offer eMMC support.
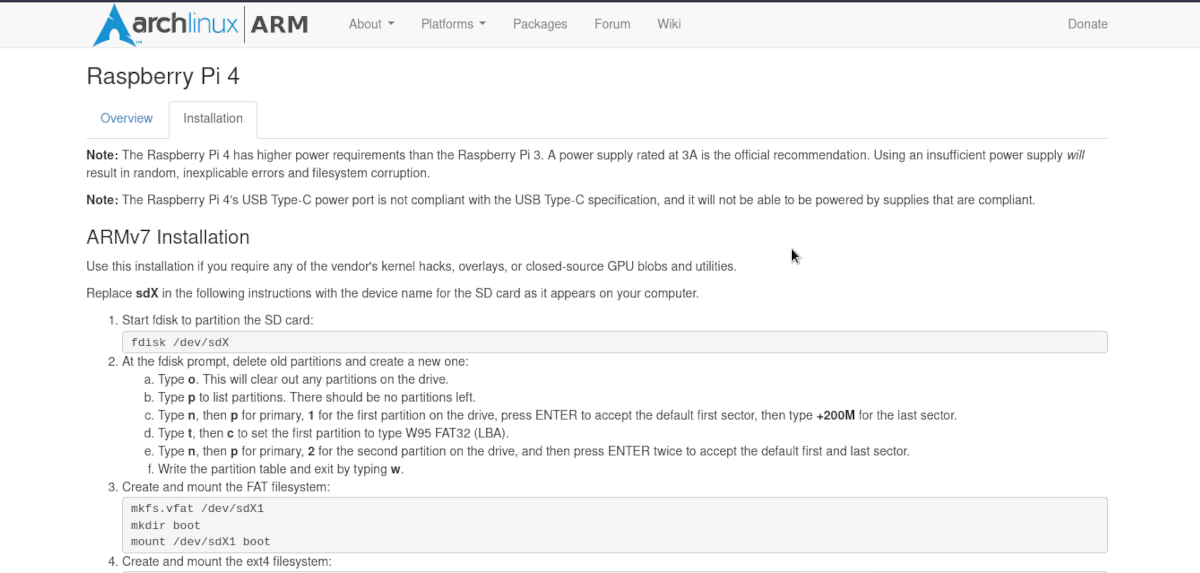
This is not the entire page, but it will give you the idea, Raspberry Pi 4b can run either a 32 Bit OS (ARMv7) or a 64 Bit OS (ARMv8). You can see part of the ARMv7 instructions, the ARMv8 instructions are further down the page.
Like all Archlinux instructions, they assume a certain level of expertise. What they don’t tell you is:
Insert the uSD card into a USB card reader and insert the card reader in a working x86_64 Linux computer.
Make sure ALL applications are closed, especially file managers.
Open a terminal window, create a temporary folder off your home folder. cd into that temporary folder and issue the following commands for either ARMv7 or ARMv8.
Once completed, unmount the USB card reader, and extract the uSD card. Insert the uSD card into the Raspberry Pi 4 and connect a Ethernet cable, a micro HDMI cable in HDMI 0 (closest to the USB 3 C power connector), a keyboard, and a Raspberry Pi 4 approved power supply. This should boot up into a Console (tty 1) window. Something like this:
EndeavourOS Linux X.XX-Arch (tty 1)
alarm login:
You are now ready for step 2, install EndeavourOS and a DE
FOR THE SECOND METHOD
My test hardware consisted of an Odroid N2, Odroid XU4, and a Raspberry Pi 4b.
If you have one of these three SBCs, you can find a more user friendly version of the above. The official ARM install manuals are located at:
Click on EOS-desktop-instructions.pdf
The manual will appear in a very basic github viewer. Click on “download” and the pdf will open in a browser pdf viewer which will allow you to save it or print it.
On pages 2, 3, and 4 are instructions using the Gparted GUI and in a little more user friendly format hopefully. Page 2 for Odroid XU4, page 3 for Odroid N2, and page 4 for Raspberry PI 4b. Plus if you are new to Arm, the manual is a good read. Although a little long winded perhaps.
NOW FOR THE THIRD METHOD
Again, if you have an Odroid N2, Odroid XU4, or a RPi4b you can use a script written specifically to partition, format, and install the Archlinux Arm base image.
Goto:
Scroll down to README.md for the simple instructions for installing an Archlinux Arm image. BTW when you do the git clone to pull the files from github to your computer, README.md is included. You can view README.md with leafpad, gedit, or other text editor. This method involves about 5 or 6 steps.
No matter which method you use, the uSD goes into a USB card reader inserted into a computer with a working Linux OS for the install. After the install, the uSD is inserted into a SBC which is conneted with an Ethernet cable, HDMI cable, keyboard, and power. It will boot into a Console window. You are now ready for step 2.
EDIT:
I take blame for part of the confusion. Any working Linux installation will work for installing the Archlinux Arm image on a uSD or eMM card. However, I suggested using a x86_64 computer and run from the EndeavourOS live ISO as the working Linux system.
The reason being, since it is a Live ISO, there is no need to clean up any files and mount points after the install because the Live ISO is not persistent. Reboot and it all magically goes away. Another reason for the EndeavourOS Live ISO is it is a known environment so if someone needs help on the forum, we know exactly what the situation is software wise, etc. Lastly it isolates the install process from someone’s daily driver so less change of borking the user’s OS.
However, anytime a user is partitioning and formatting a storage device, it is critical that the user knows exactly which device to select. Select the wrong device and it could be a very unhappy day.
NOW go to How to install EndeavourOS Arm Step two
Pudge